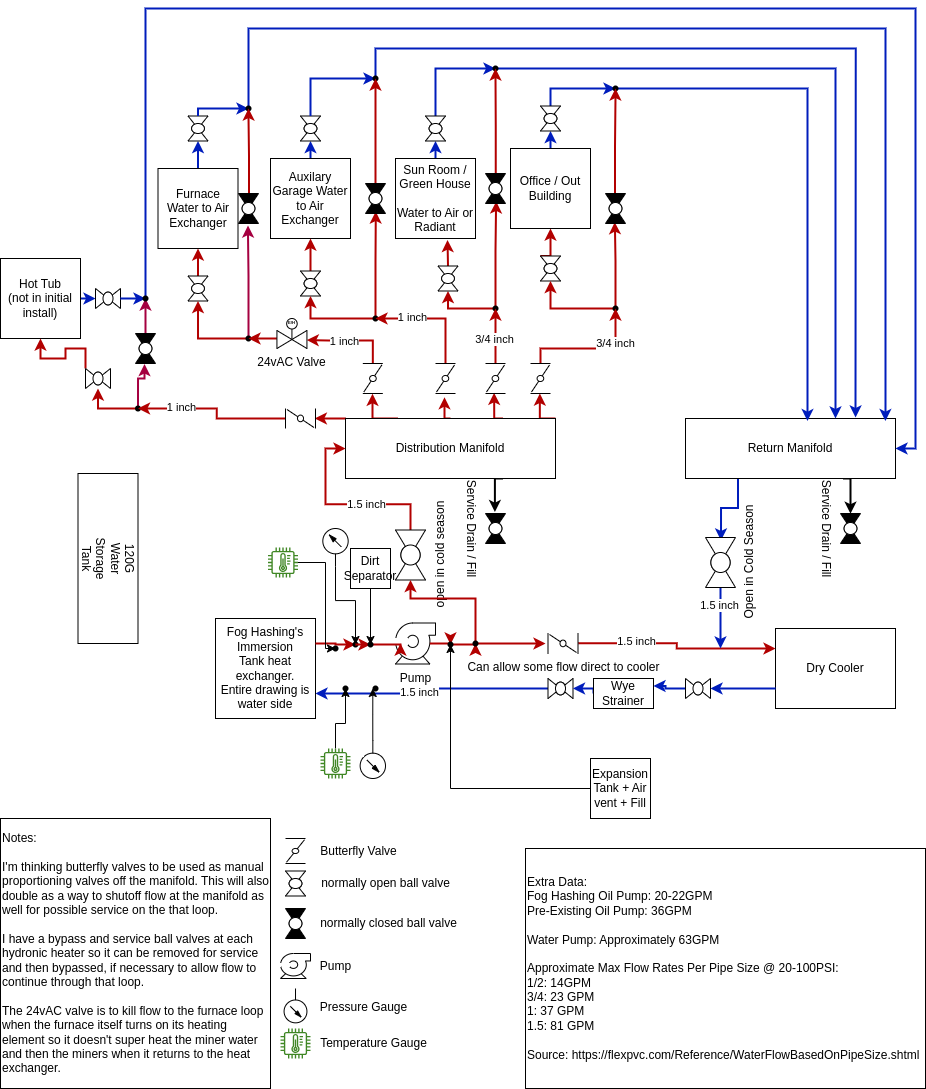
A few changes, but not much. My thoughts on the wye strainer is to catch any debris that could result in large contamination or part failure before it hits the brazed plate heat exchanger and clogs it.
2 Likes
A preliminary parts list. I’m working with a factory that produces these parts and I’m hoping they will cut me a good deal on the fittings/valves/etc… as it’ll be spendy.
All Stainless Steel Parts
Butterfly valve for regulating flow manually
1.5" Butterfly Valve NPT x 1
1.0" Butterfly Valve NPT x 6
1 piece Ball Valve for shutoff, bypass, heat exchangers
1.5" MNPT x 5
1.0" FNPT x 11
3/4" FNPT x 6
Female Hose Nipple
1.5" FNPT x 40mm Hose Barb x 10
1.5" MNPT x 40mm Hose Barb x 6
“Zone Valves” 24vAC (same voltage as taco valves)
1" NPT 2-way valve x 2
Y Strainer
1.5" NPT x 1
Vent Valve
1" NPT x 1
3/4" NPT x 1
Double Threaded Nipple for between Tees, leave enough space to replace valves, if necessary.
1.5" NPT Male x 3" (check actual dimensions) x 10
Tees
1.5" FNPT x 12
Cross
1.5" FNPT x 2
90 Degree M/F Elbow
1.5" NPT x 2
Reducing Nipple
1.5" MNPT to 1" MNPT
Plug / Caps
1.5 MNPT Plugs x 4
I thought about doing camlocks for the rubber 1.5" hose, but decided against it for the time being. I’m essentially making the manifolds out of “Tees”. This also doesn’t include any of the pex specific fittings
1 Like
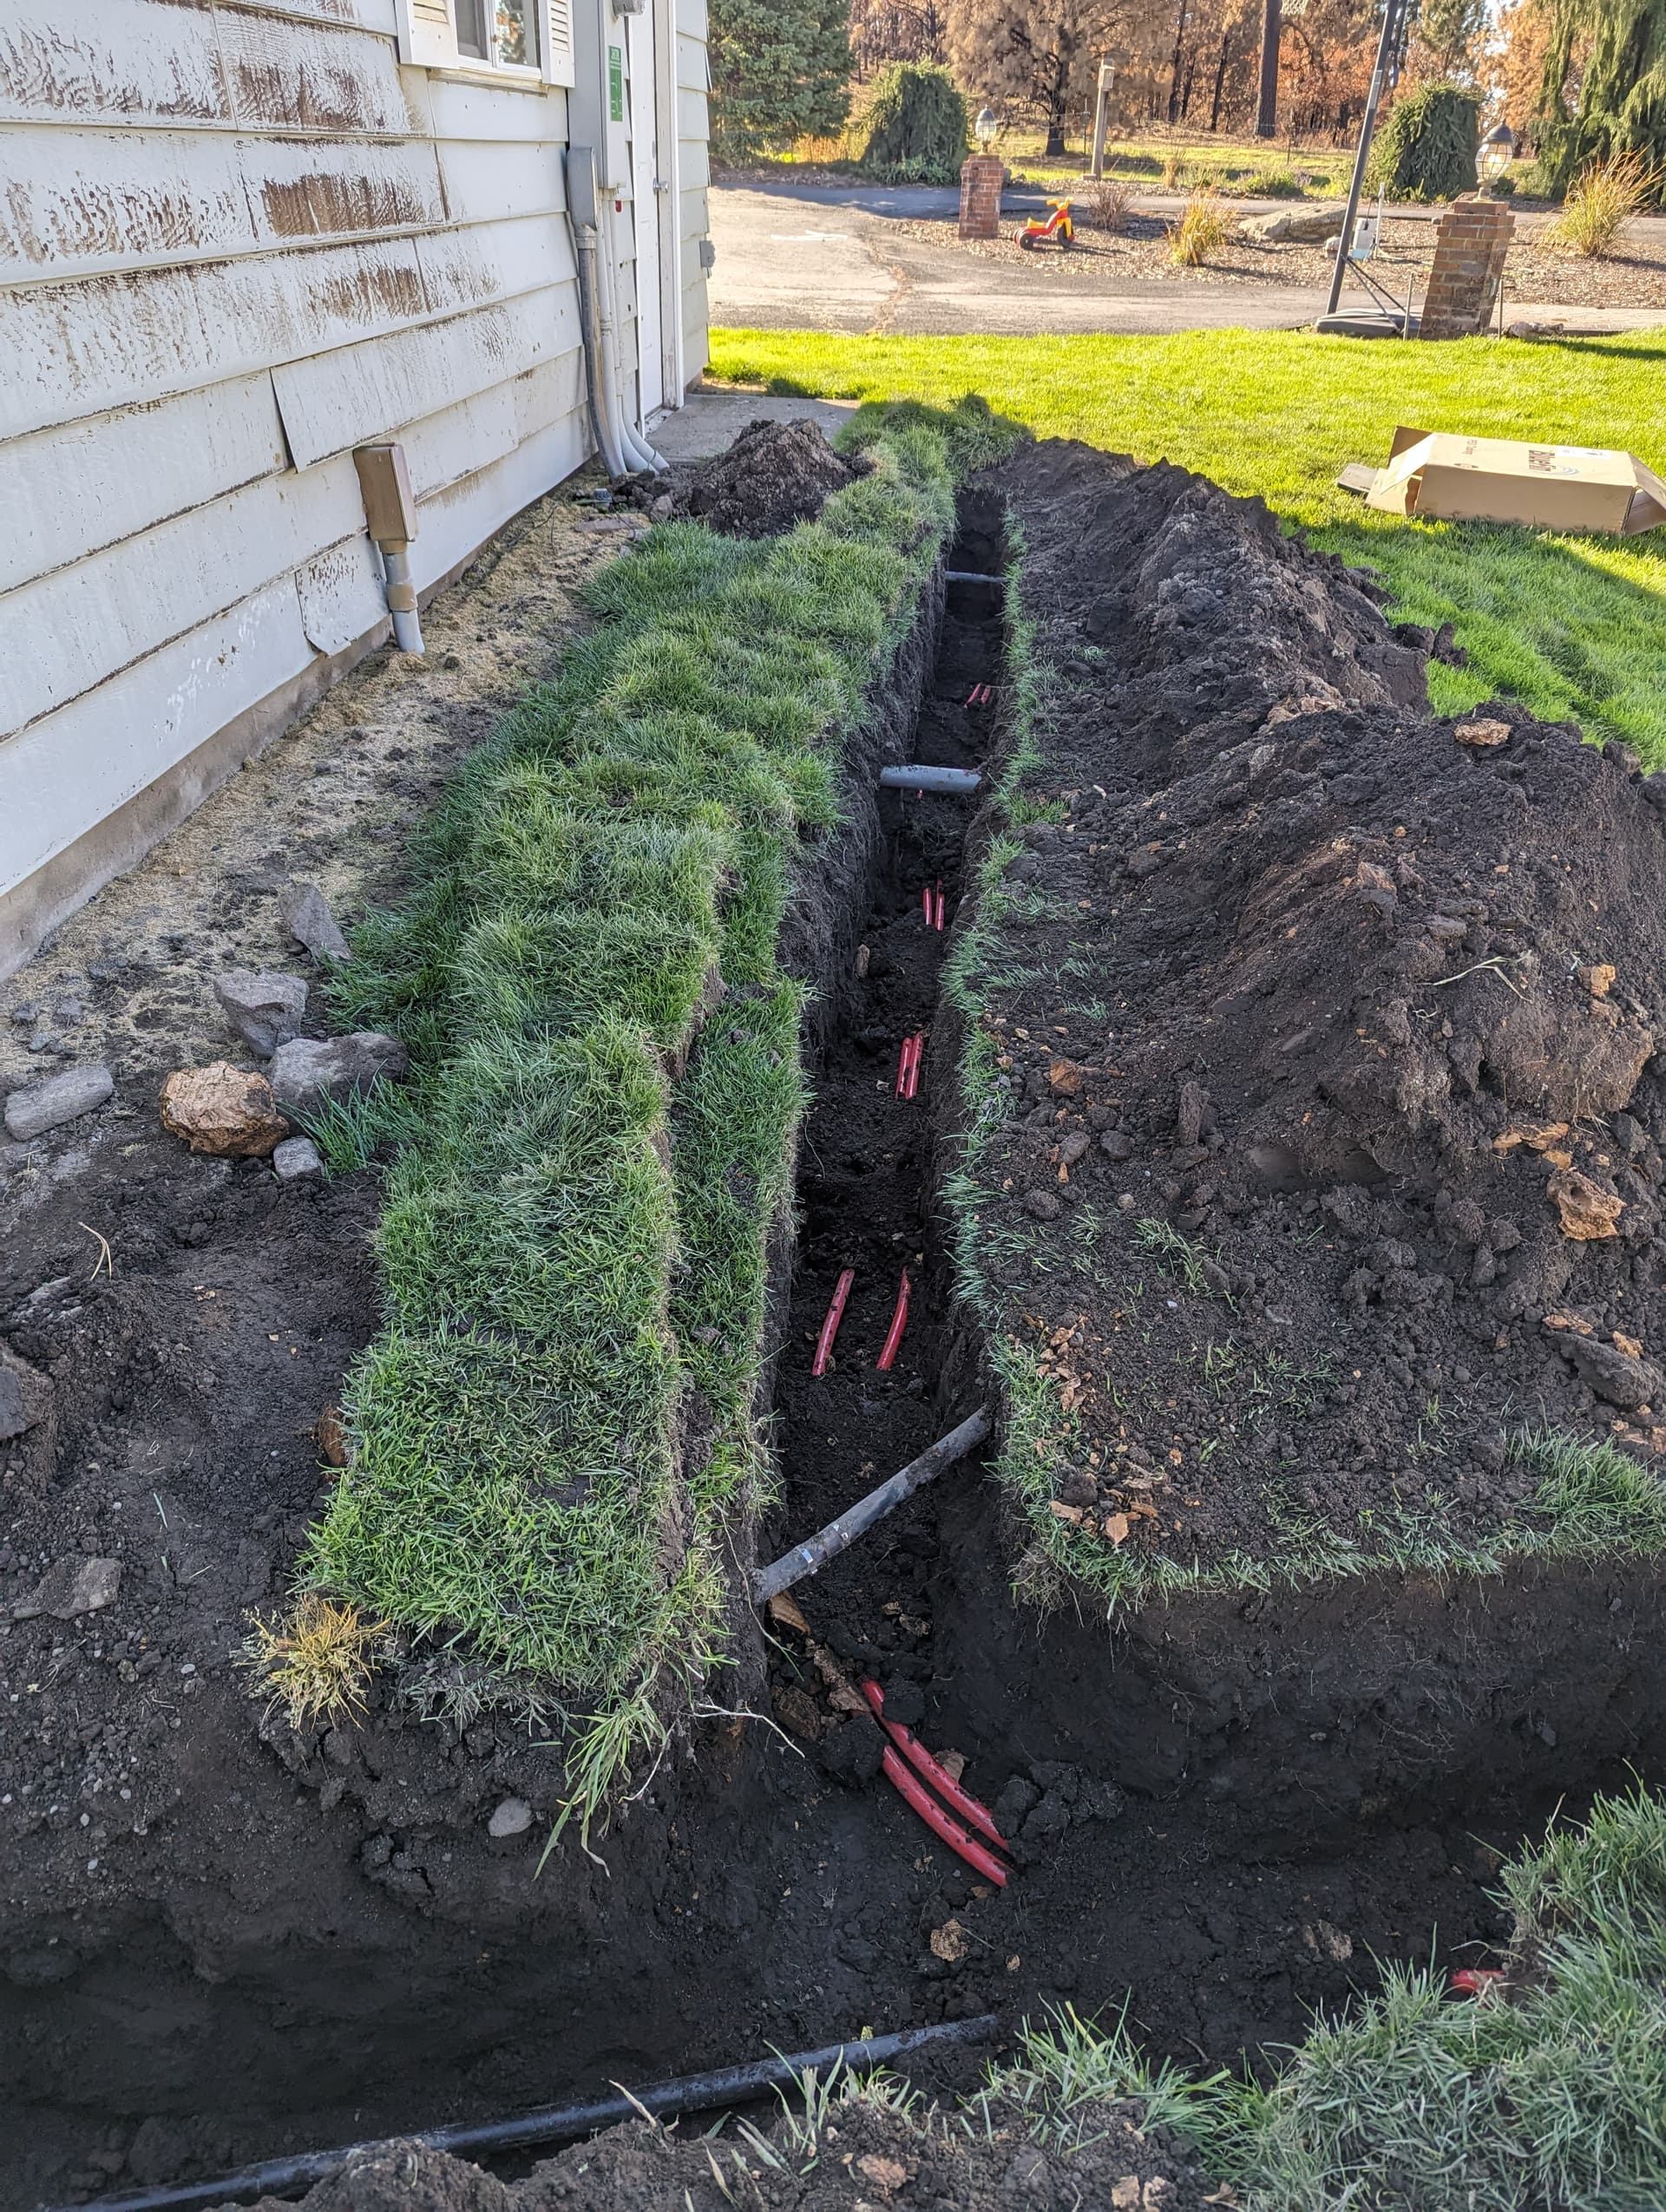
Pretty much finished the ditch and laying the pipe. The red is the oxygen barrier 3/4" pex. The black is just a water line that goes out to my field. The ditch is now buried, but I didn’t take any pics of that.
This is where it enters under the house and will go into the garage where the immersion tank resides


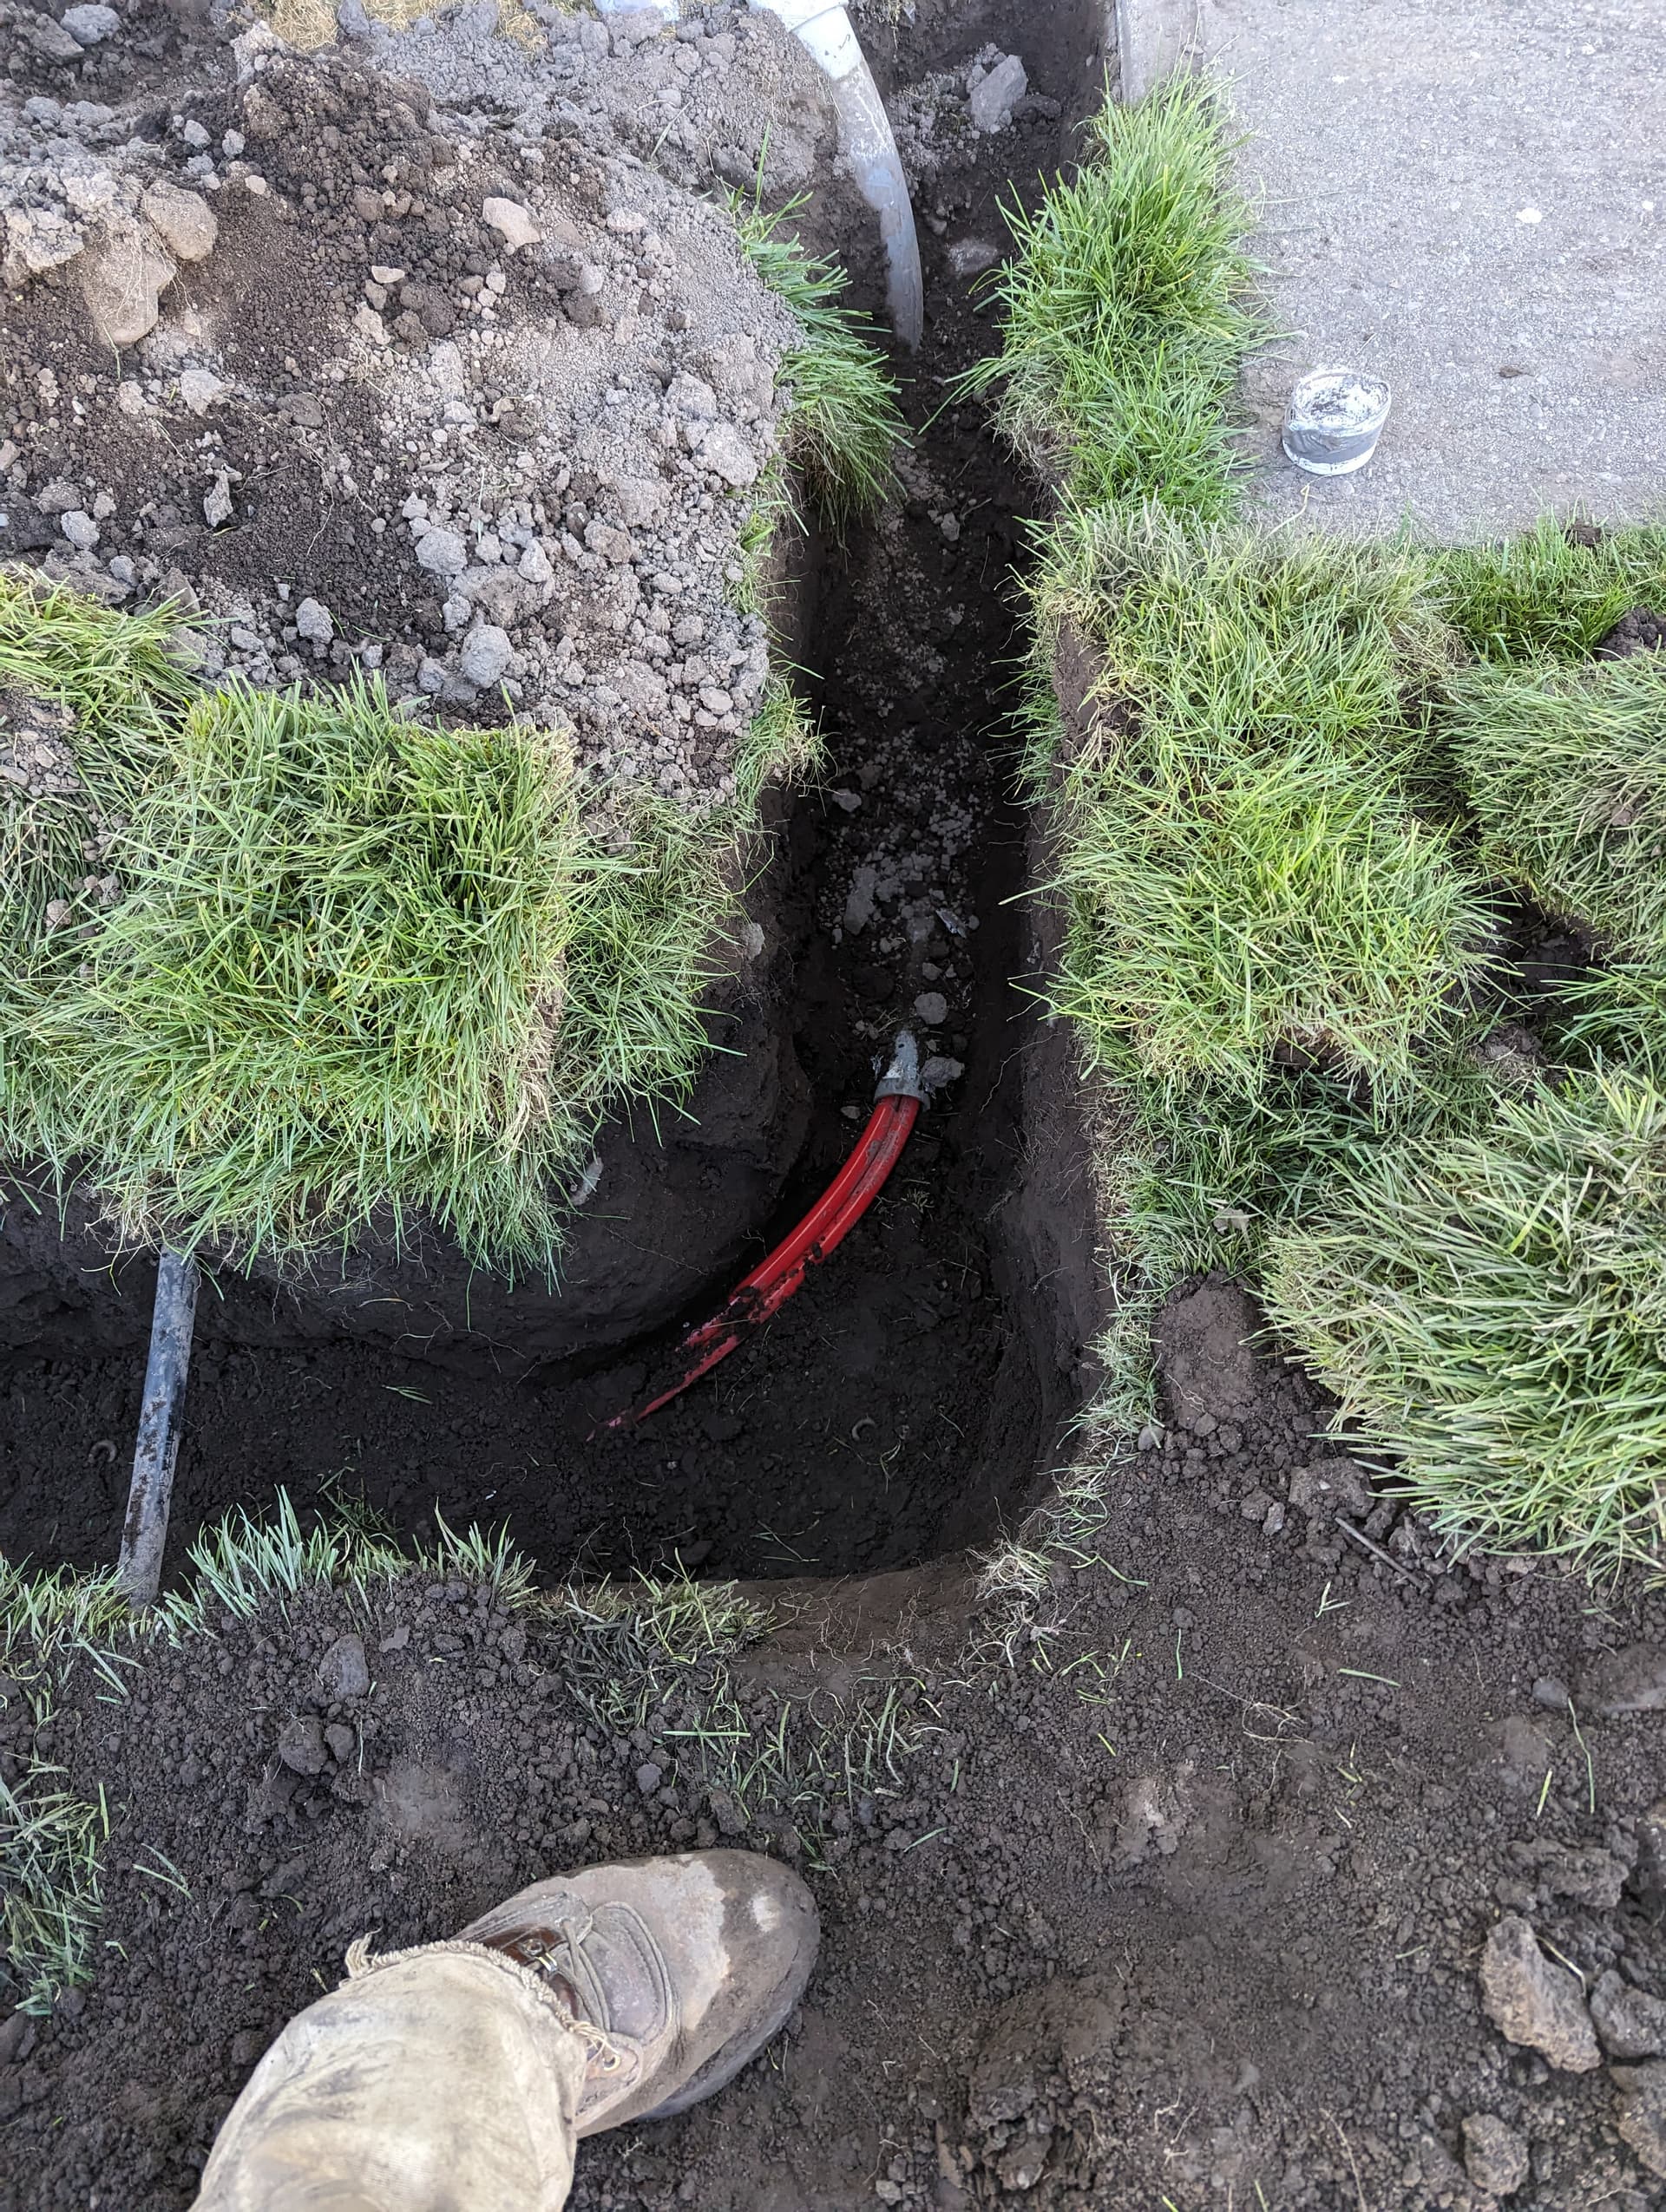
Where the pex comes into the outbuilding where a hydronic heater will hang.

The conduits were sealed up with duct seal that will keep a lot out of them.
3 Likes
Alrighty. I think getting closer to the final. I’ll show the latest design and give some thoughts and justification on it.
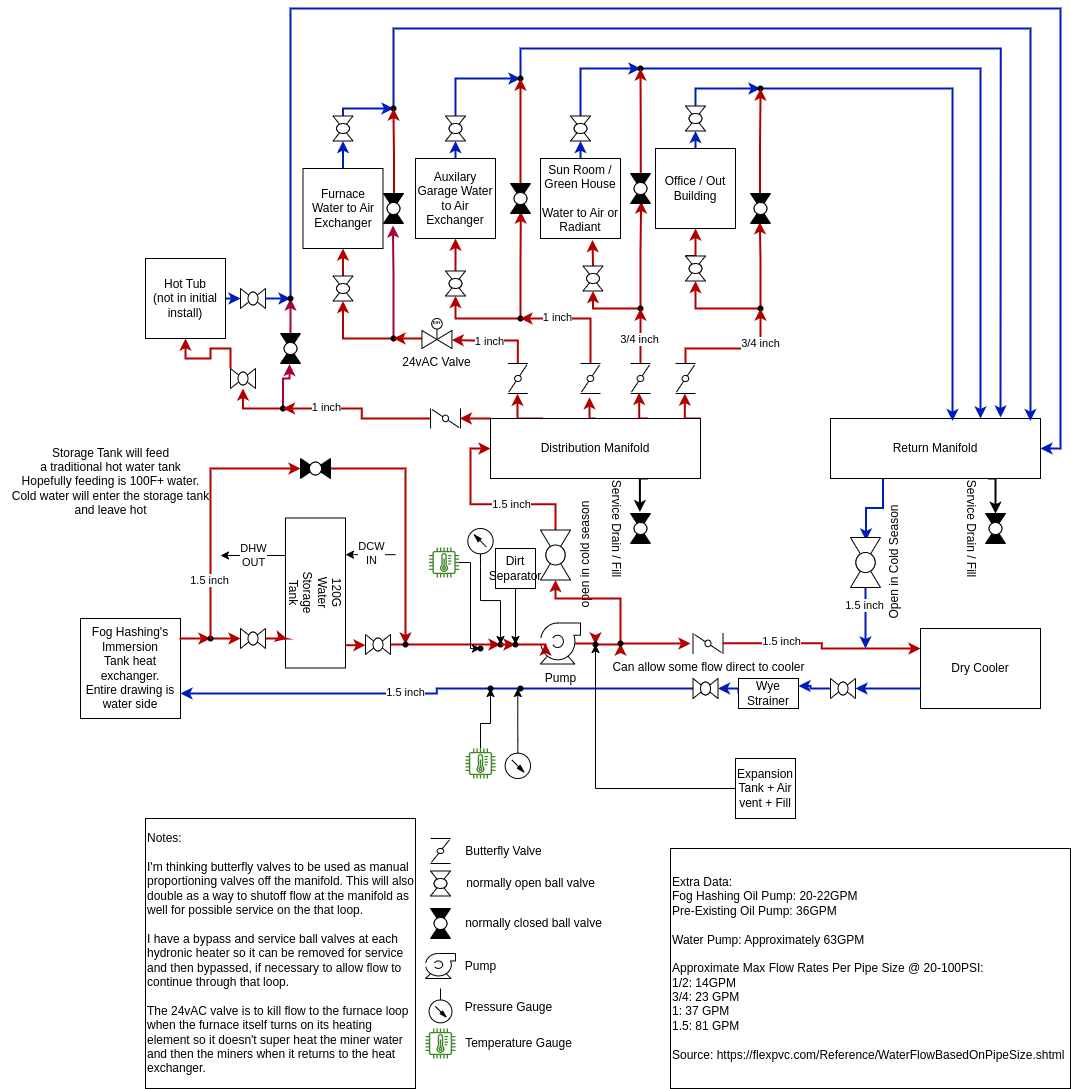
The glycol will run through the storage FIRST as this is the highest temp requirement in the system. From there is gets distributed to the remaining “zones”.
I have chosen to put bypasses on everything to allow for flow without that exchange medium attached.
I have chosen a pretty much manual control system initially. In a sense this is to see how it works with minimal expense. This is related to heat production and also flow. It also allows me to get up and functioning rather quickly. As bob has shown, he has provided a third loop option as well. This may all change after this first year if the reclamation works well.
My additional thought is I do not care if the spaces are over heated during the cooler seasons. As long as the miners are cool enough that is good for me. In the cool seasons I want to shut the fans off on the dry cooler. If I can achieve these things then it’s a success for me.
Edit: I do have a parts list out to a factory now. Just waiting a quote on all fittings.
1 Like
Not a whole lot happening that’s exciting at the moment. I’m still working on parts acquisition. The design is basically finished for this first iteration.
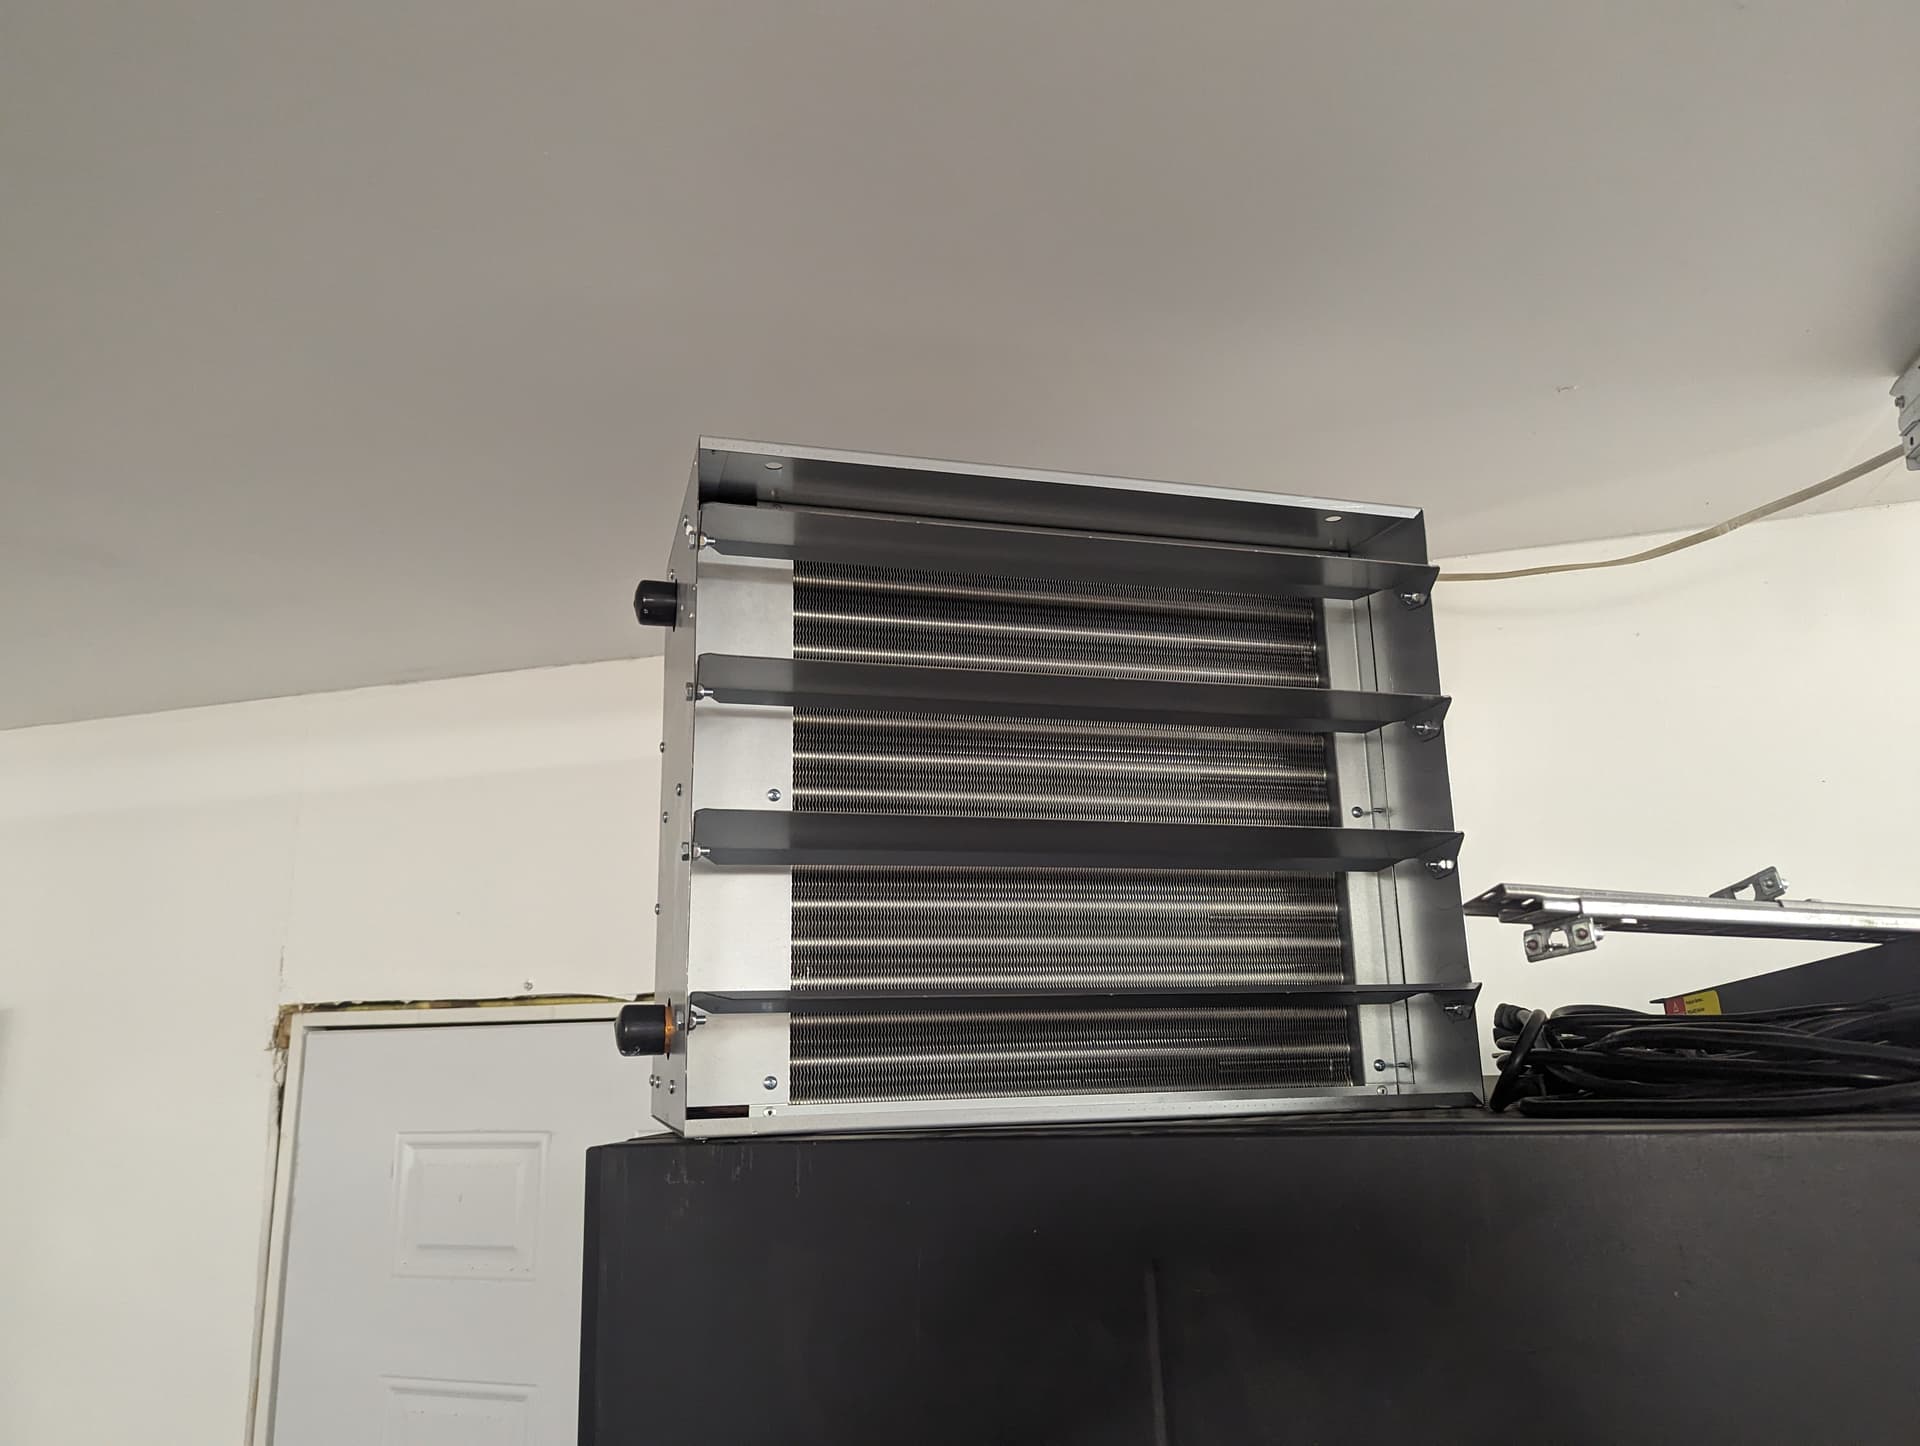
I’ll be going with TWO “100k BTU” hanging hydronic heaters. One for the garage and one for the office/workspace. I’m trying to get some decibal ratings on the fans. The fans do have a low and high. Most 120v/240v single phase fans shouldn’t be run on rheostat so I like the two speeds. When I’m in the office I can put it on low and then when I leave I can crank it up.
Inside the furnace will be a 16x20 “140k BTU” heat exchanger. This is sized simply based on the physical dimensions.
I think the ratings on all these units are a little inflated and I upsized the hanging units in hopes that I never have a problem dissipating enough heat to keep the miners cool in seasons where the temps are 60F and below as the highs. This is a huge portion of our year here. Also the water running through them will not be as hot as if there was a boiler, so the actual dissipation will differ quite a bit.
100k Hanging Unit that I SHOULD be using. I’m waiting on dB info.
Heat exchanger for furnace, 16x20:
edit: another reason I didn’t want to go with a rheostat style adjustable fan speed is because the fan has a single speed and you’re literally just burning up that extra power that you’re not giving the fan in the rheostat. This is a complete waste and they get HOT. 2 speed fan for the win.
1 Like
The mrs will be stoked when I come home with a steam engine trying to get back some power from the miner lol
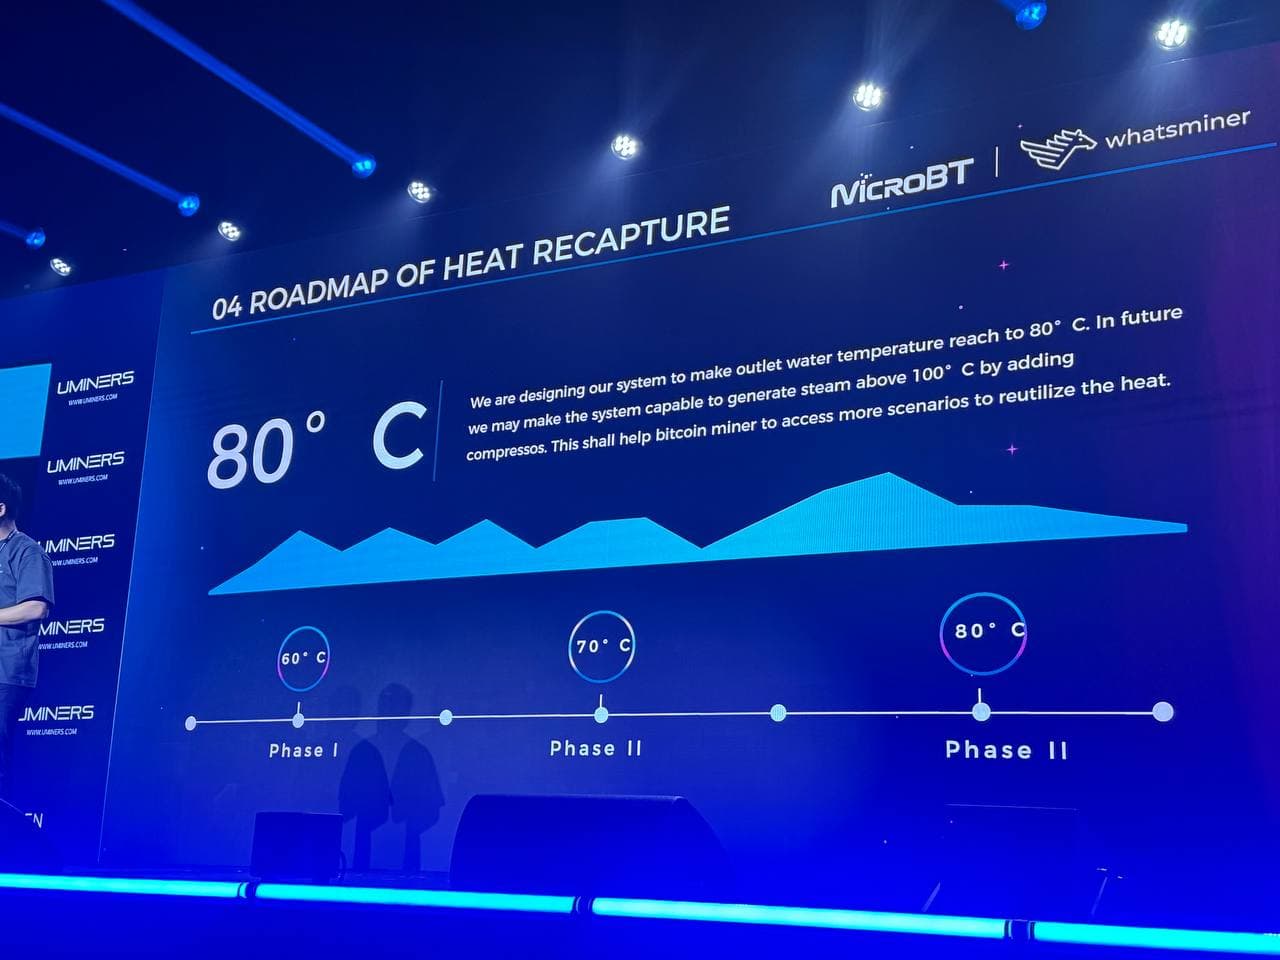
I can’t wait to see how that unfolds! With my current setup I would like to keep temps at 40-45 max. In the hot days of summer they did run at about 52C outlet oil temps during the heat of the day at just over 100F ambient temp in the shade.
I’m thinking if we can create steam then we should install a sauna! hahaha. instead of putting water on the hot rocks it’ll be btc miners in the middle. lmao
BTW: all parts for the rest of the heat reclamation system have finally been sourced and purchased. Now it is just a waiting game with a little bit of prep work while I wait.
2 Likes
I wouldn’t be surprised if in future we see a miner that has thermal electrics in between the chips and the heat sink to power another board if they peak with the chips they make
Btw I’m sitting in my sauna while I write this, infa red not steam though, does 1800 watts for a 2 person one. 100% recommended getting one
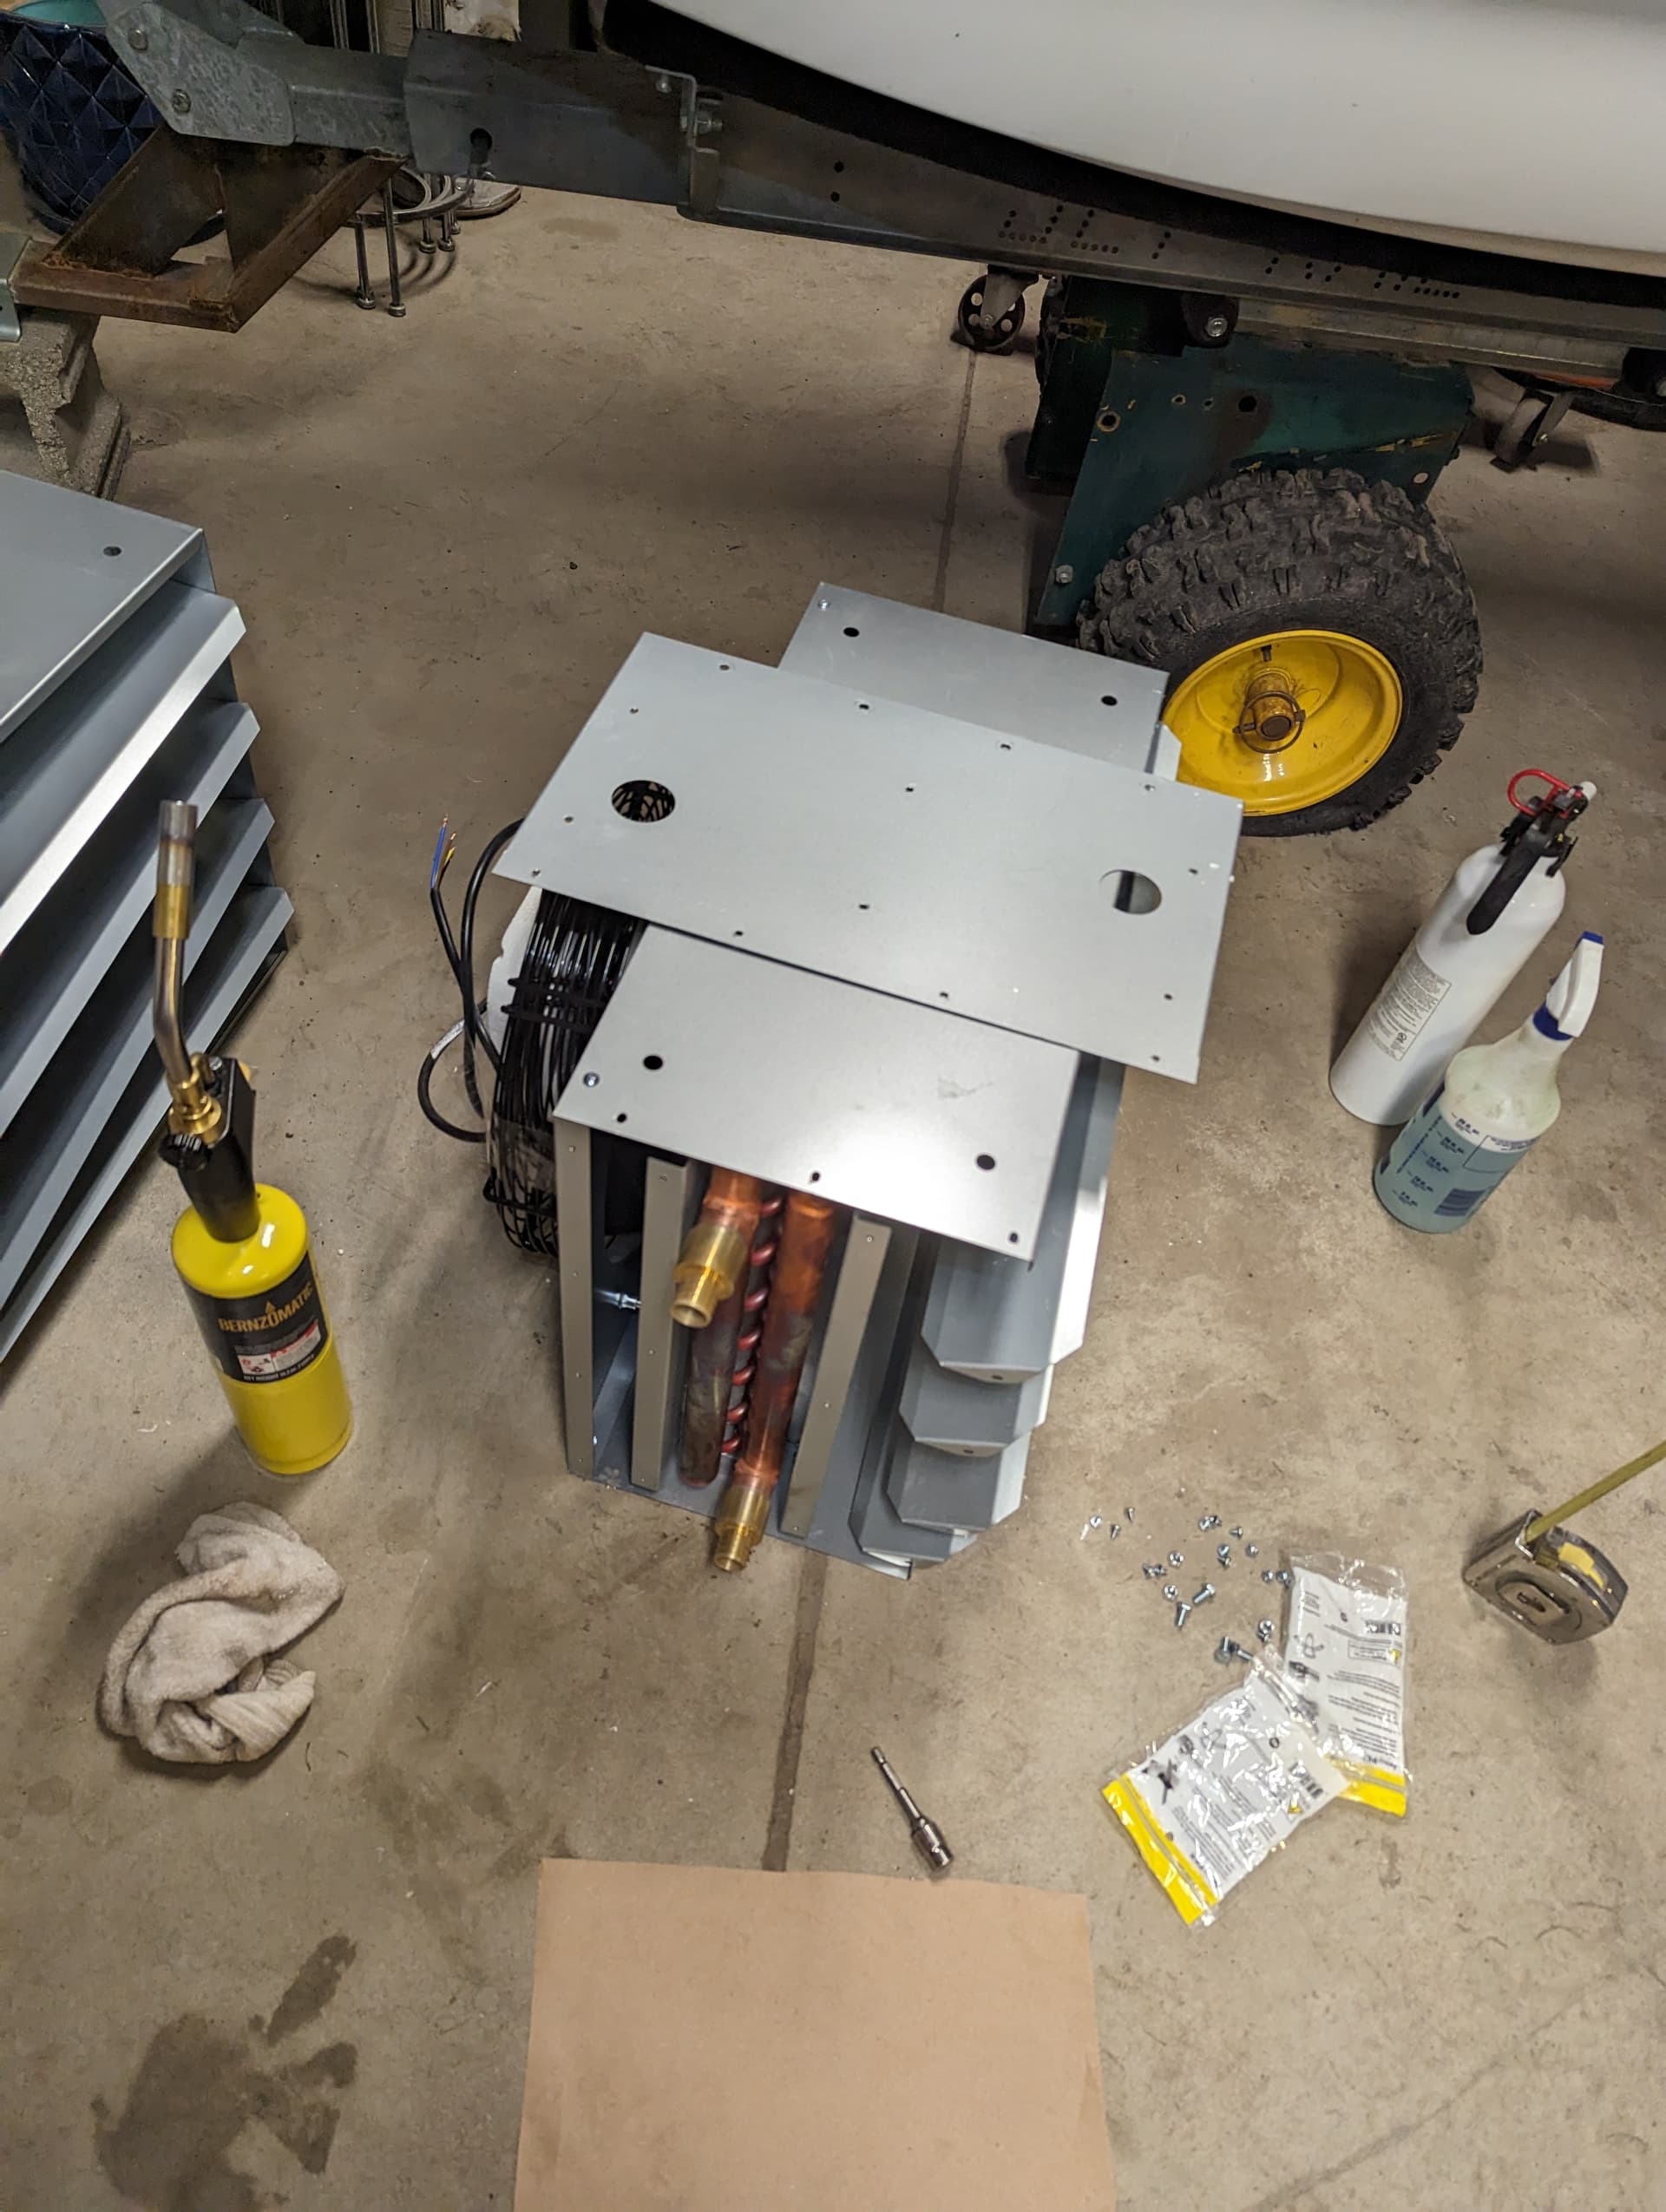
Unexpectedly, the heat exchangers arrived today! It’s time to get to work!
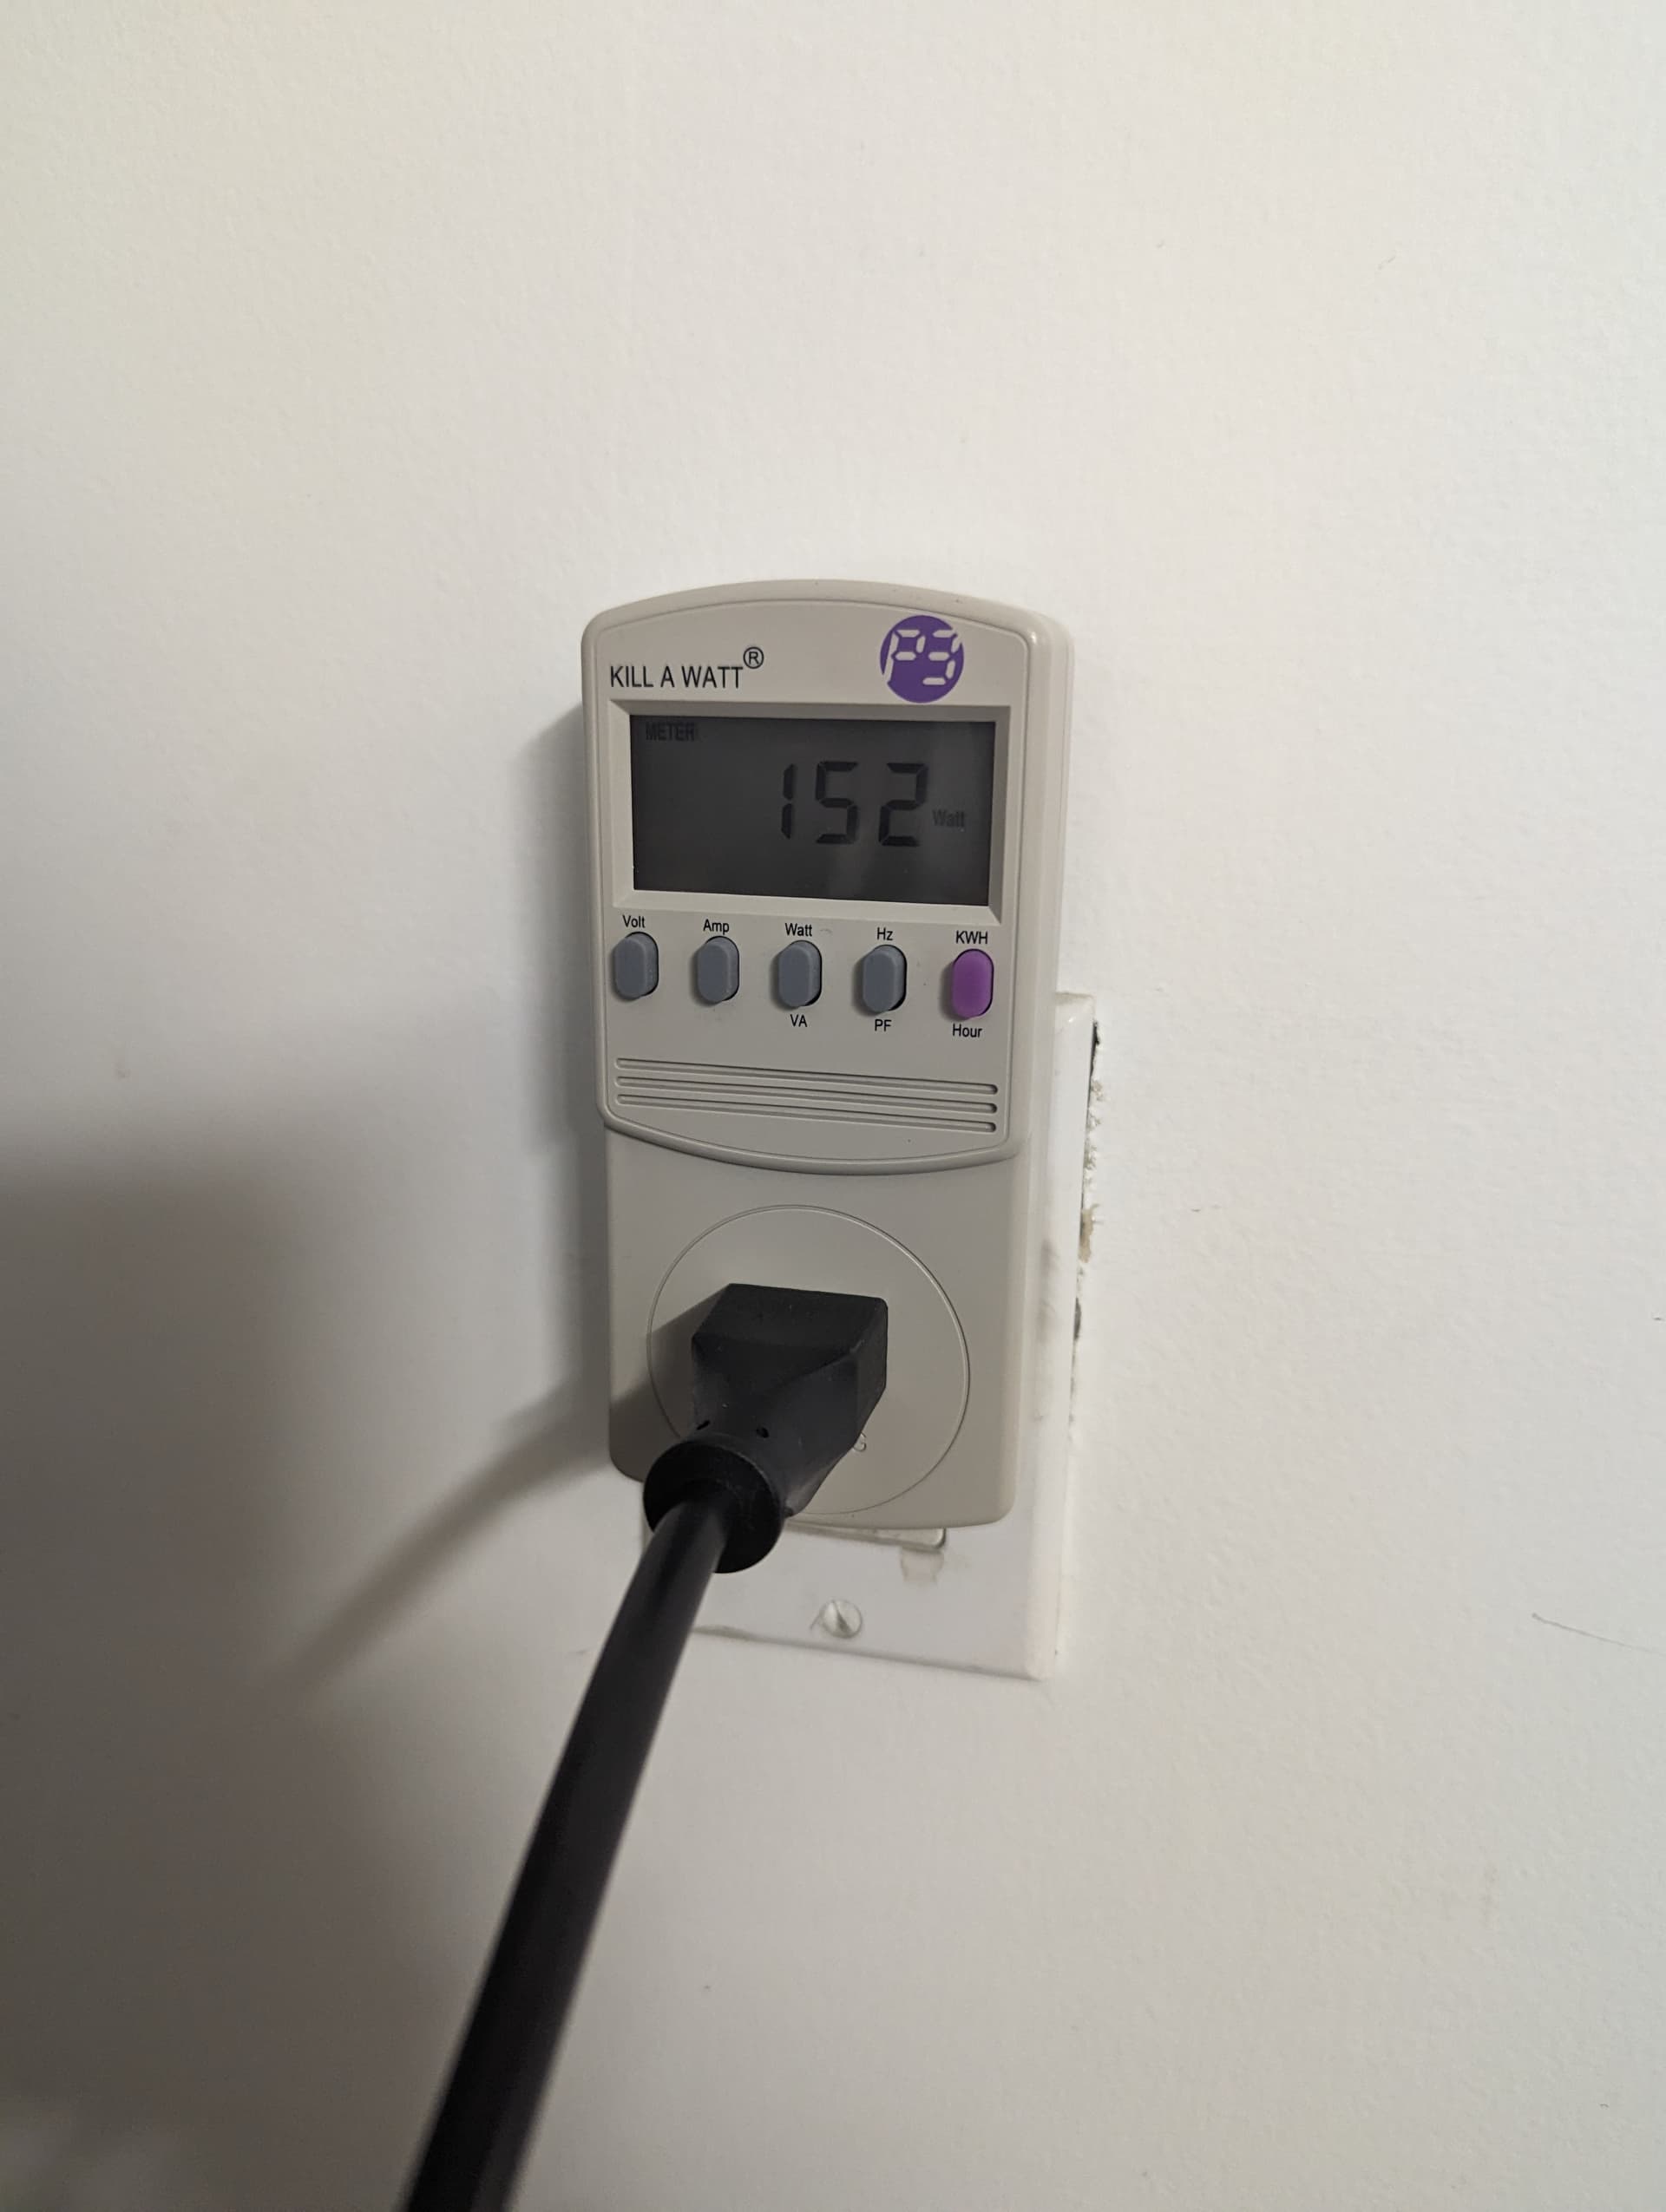
On low speed, the fans use 110W and on high they use about 150W. On the low speed, it does not bother me and roughly about as loud as my englander 25-pdv pellet stove fan. Honestly, high isn’t too terrible either.
It is currently sitting on top of a rack and it’ll get hung up on the ceiling just off to the side of that. It is in the general area that it will be installed.
Neutral gets switched to change speeds. 120v 2 speed fan


e
2 Likes
Got the rest of my brass fittings. I’m hoping the SS will be here at the end of the month.
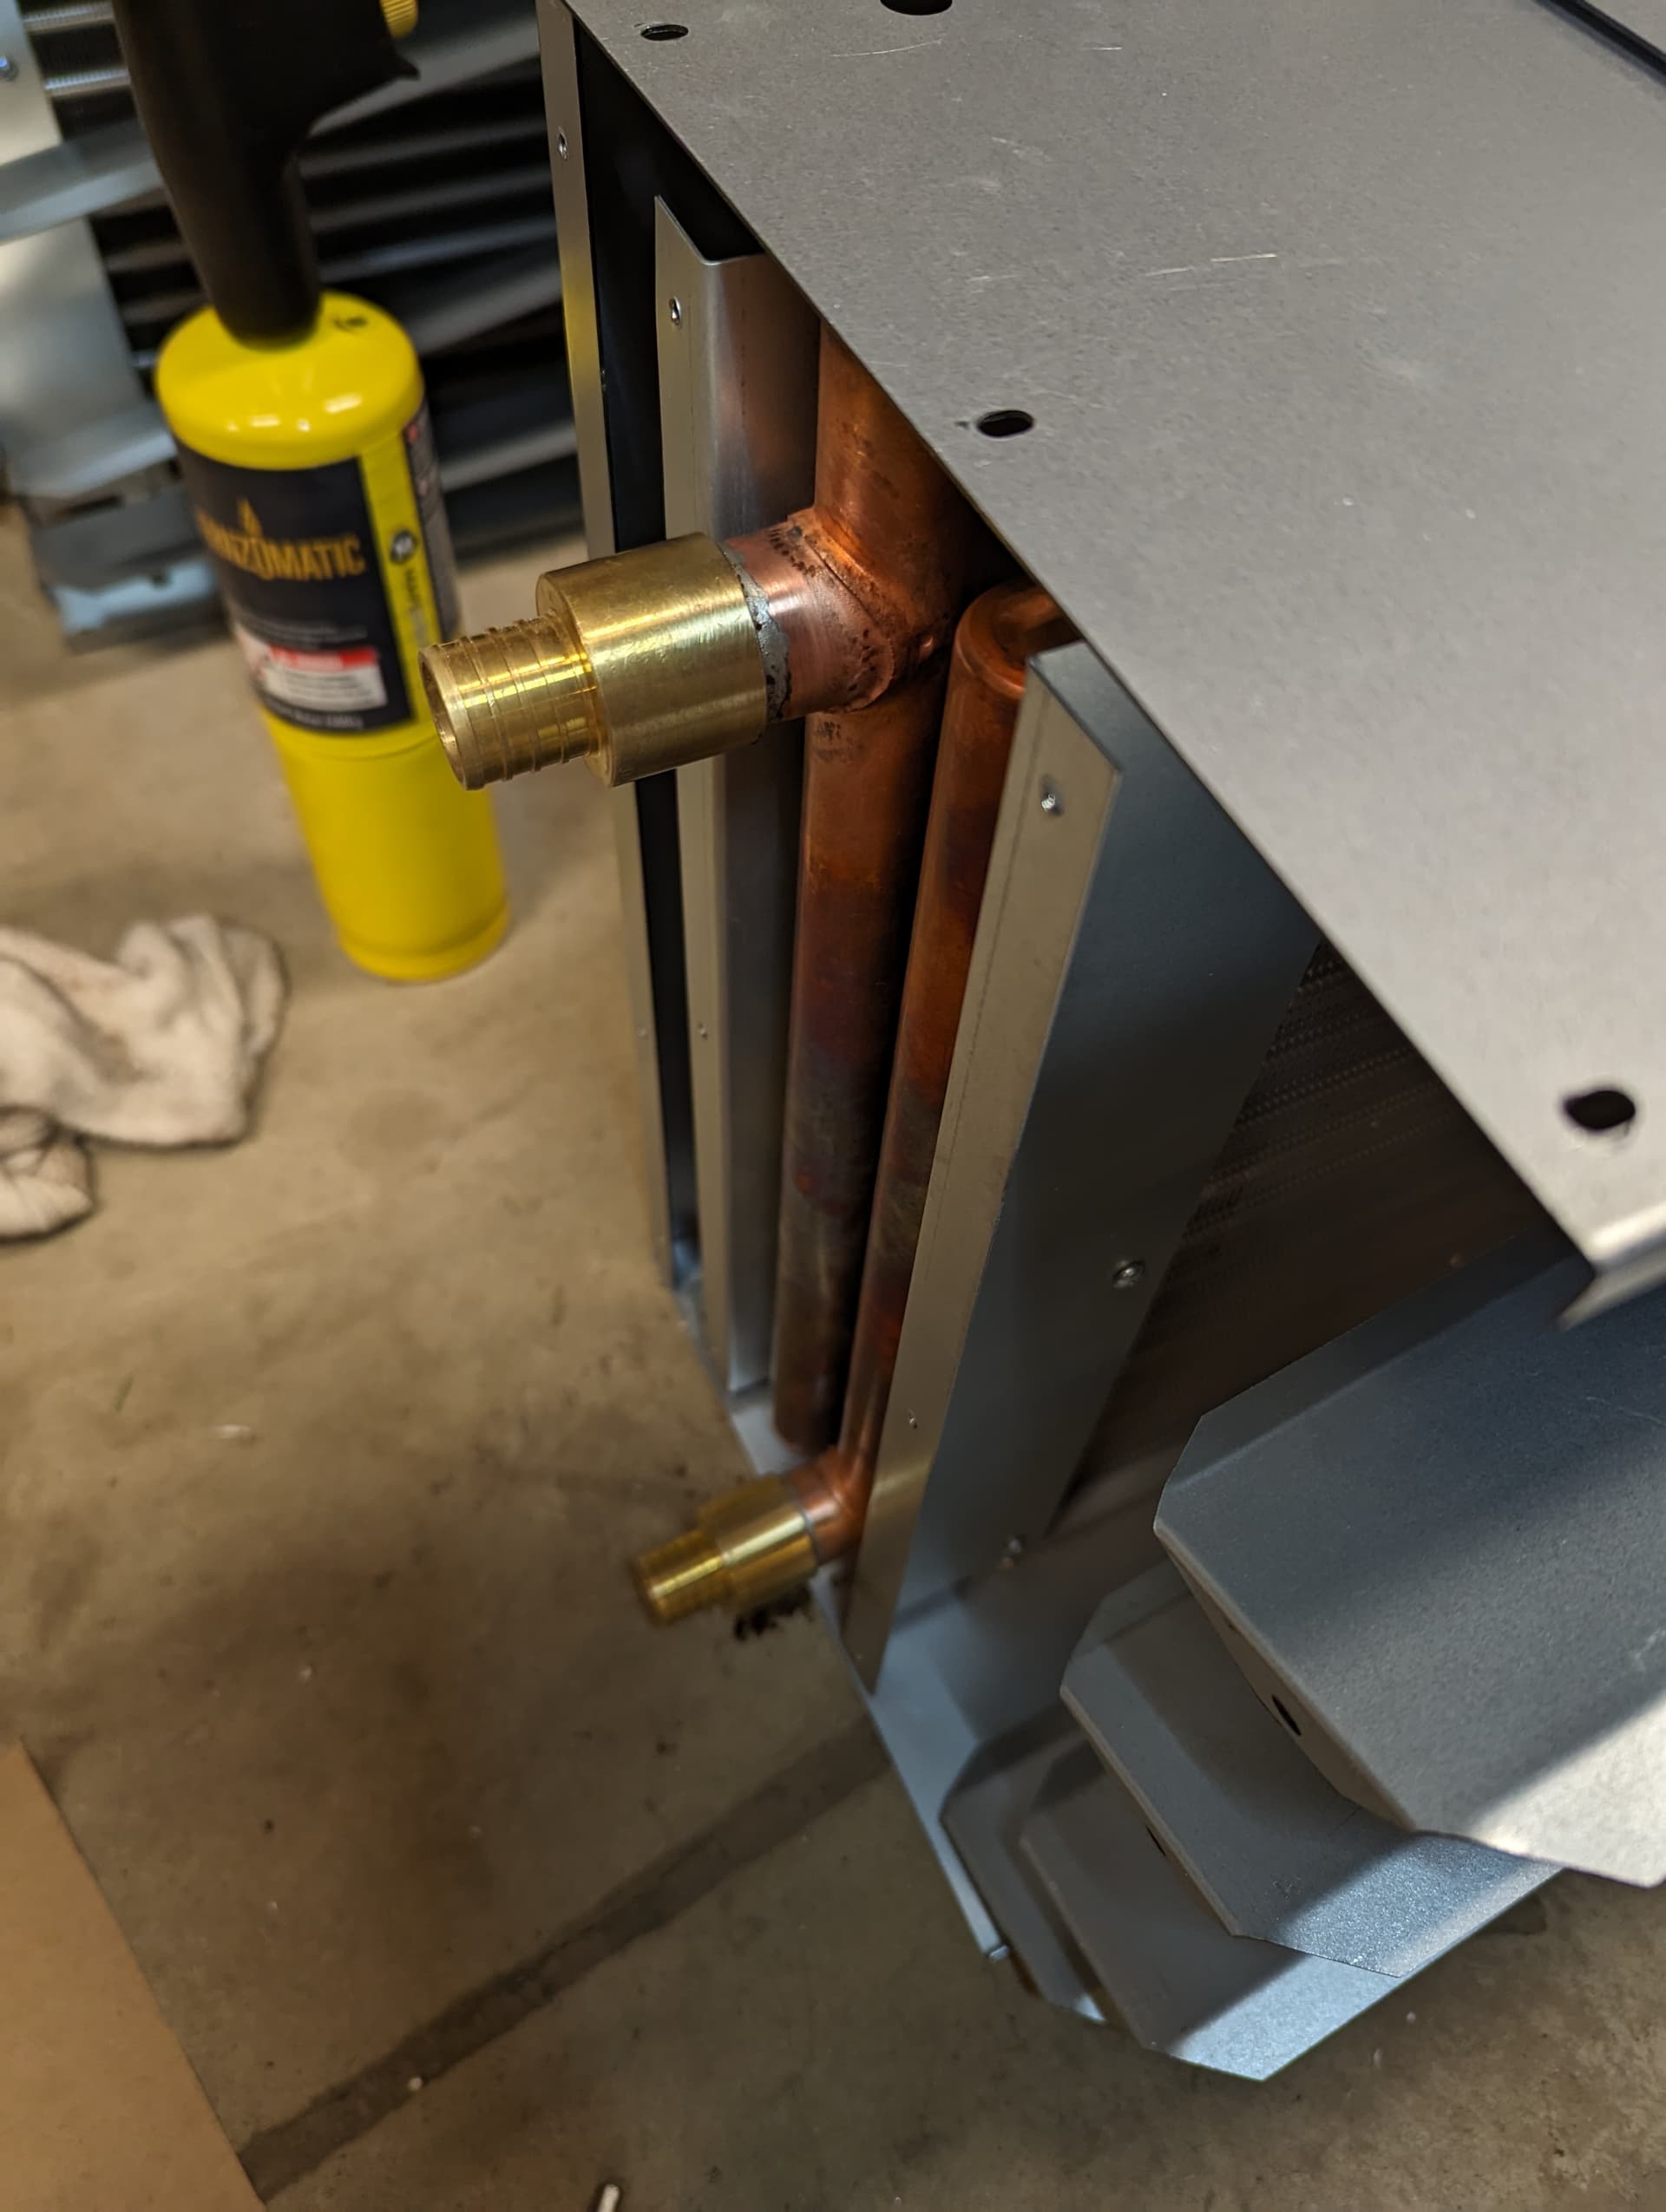
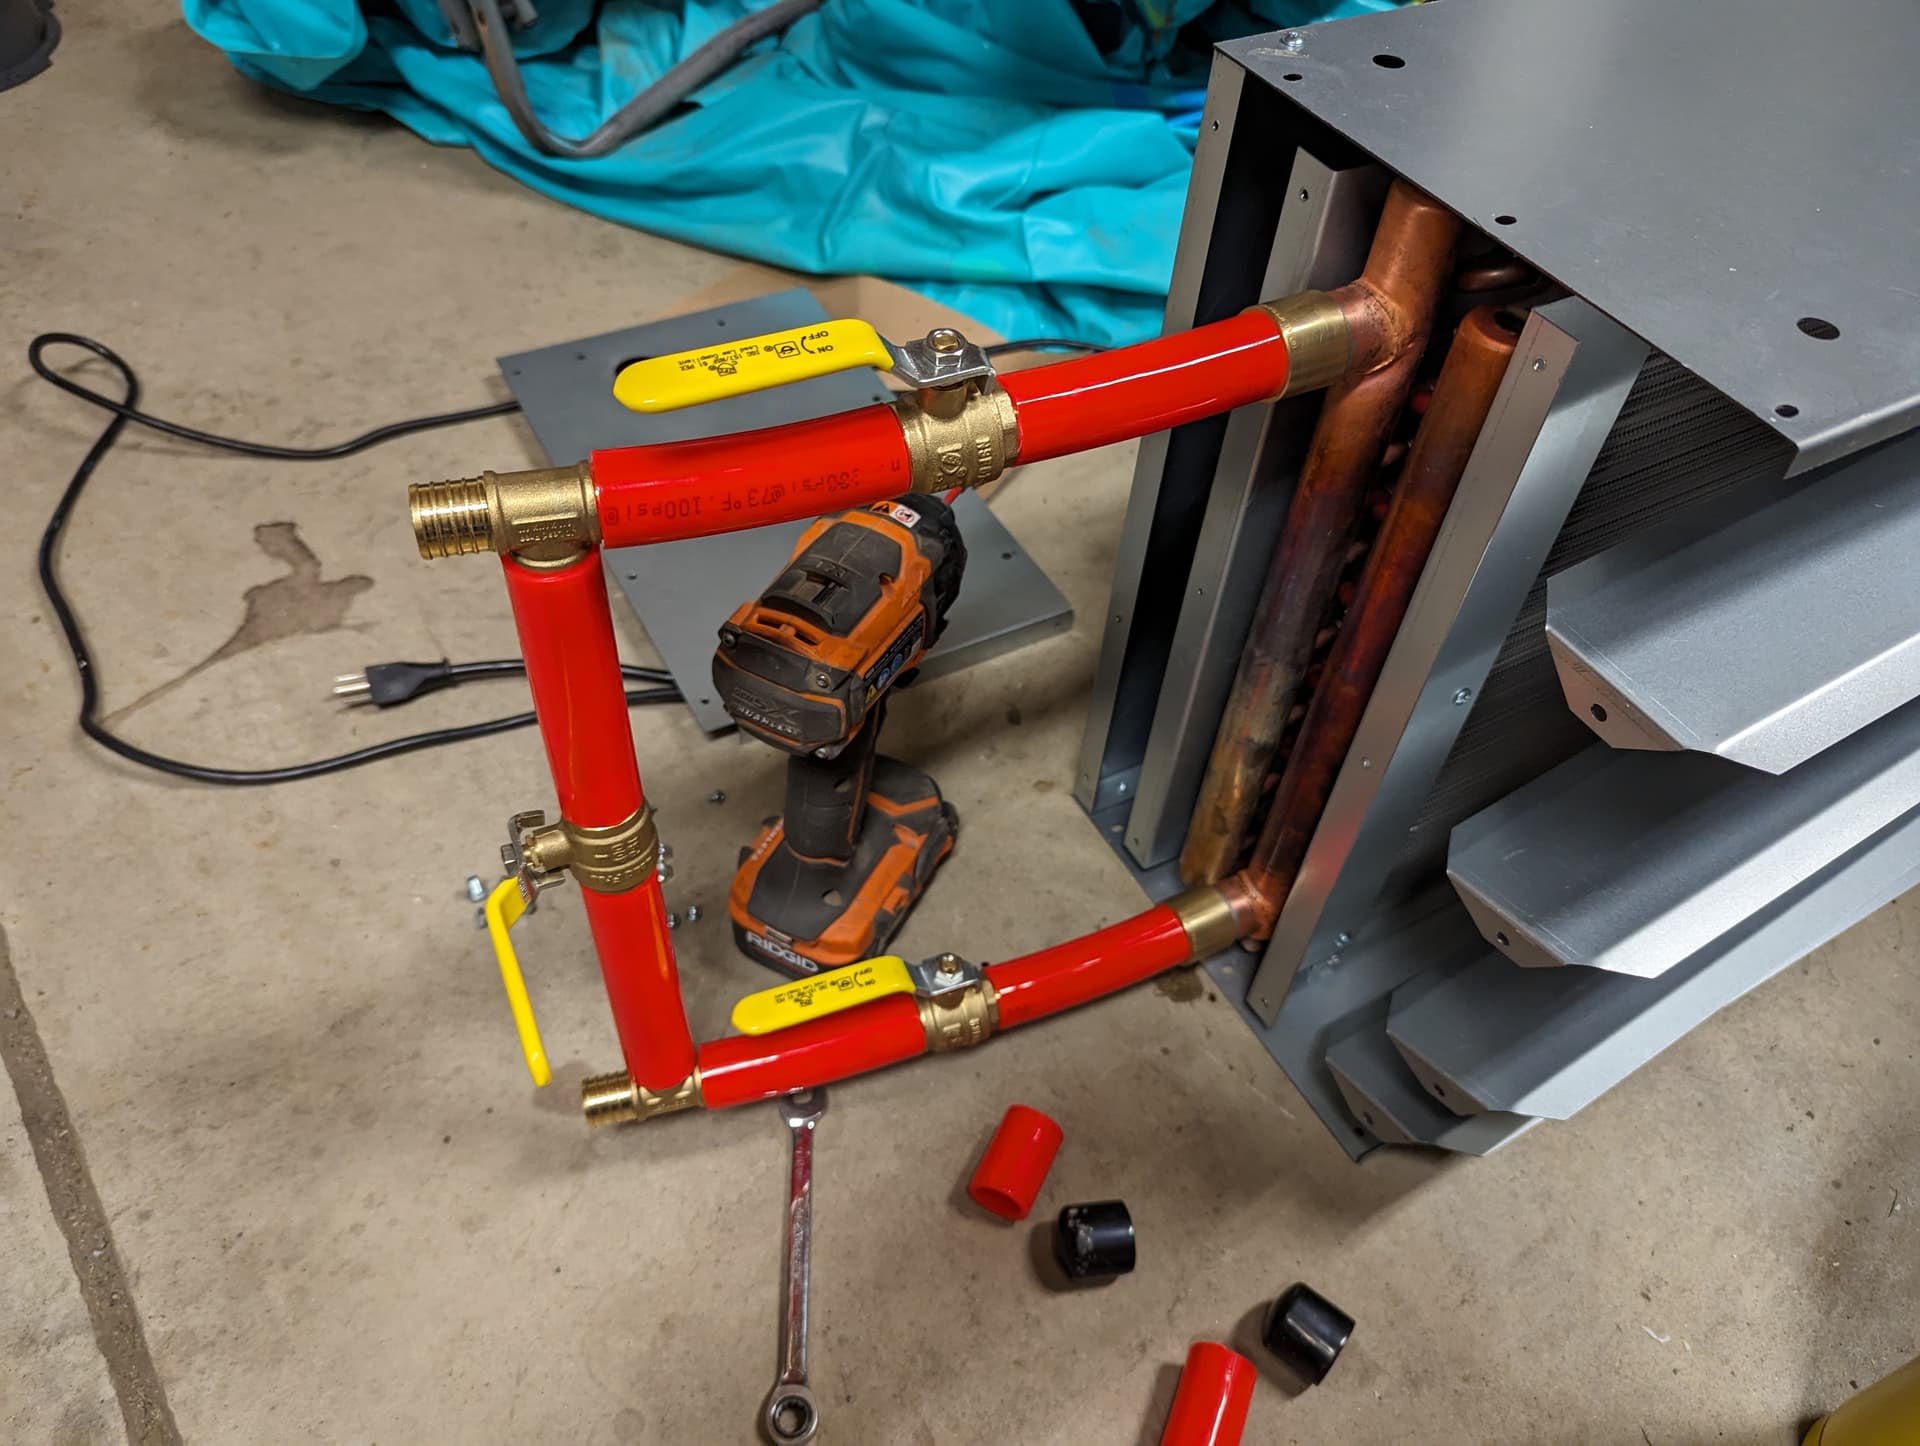
Got my fittings sweated/soldered. I don’t have enough clamps to leak test the two hanging units. I have clamps coming in the mail. The bare exchanger tested well with only an air leak at the npt fittings of my test unit that I only used teflon tape on. I tested to see if it would hold at 50lbs of air or so. If it can hold that then There should be no issue holding 20lbs of water, I would think.
Kind of mocked up the fittings so I can get right to work when the clamps show up. It was just SOOOO much cheaper to order them. I took the sides off the exchanger casing so that I could put a wet cloth around the exchanger tubing so it wouldn’t melt the solder on the exchanger side when sweating these fittings on.

I HOPE to get the mounts setup to hang them in the garage tomorrow. If the side will fit back on with clamps then I may hang them tomorrow. We will see.
3 Likes
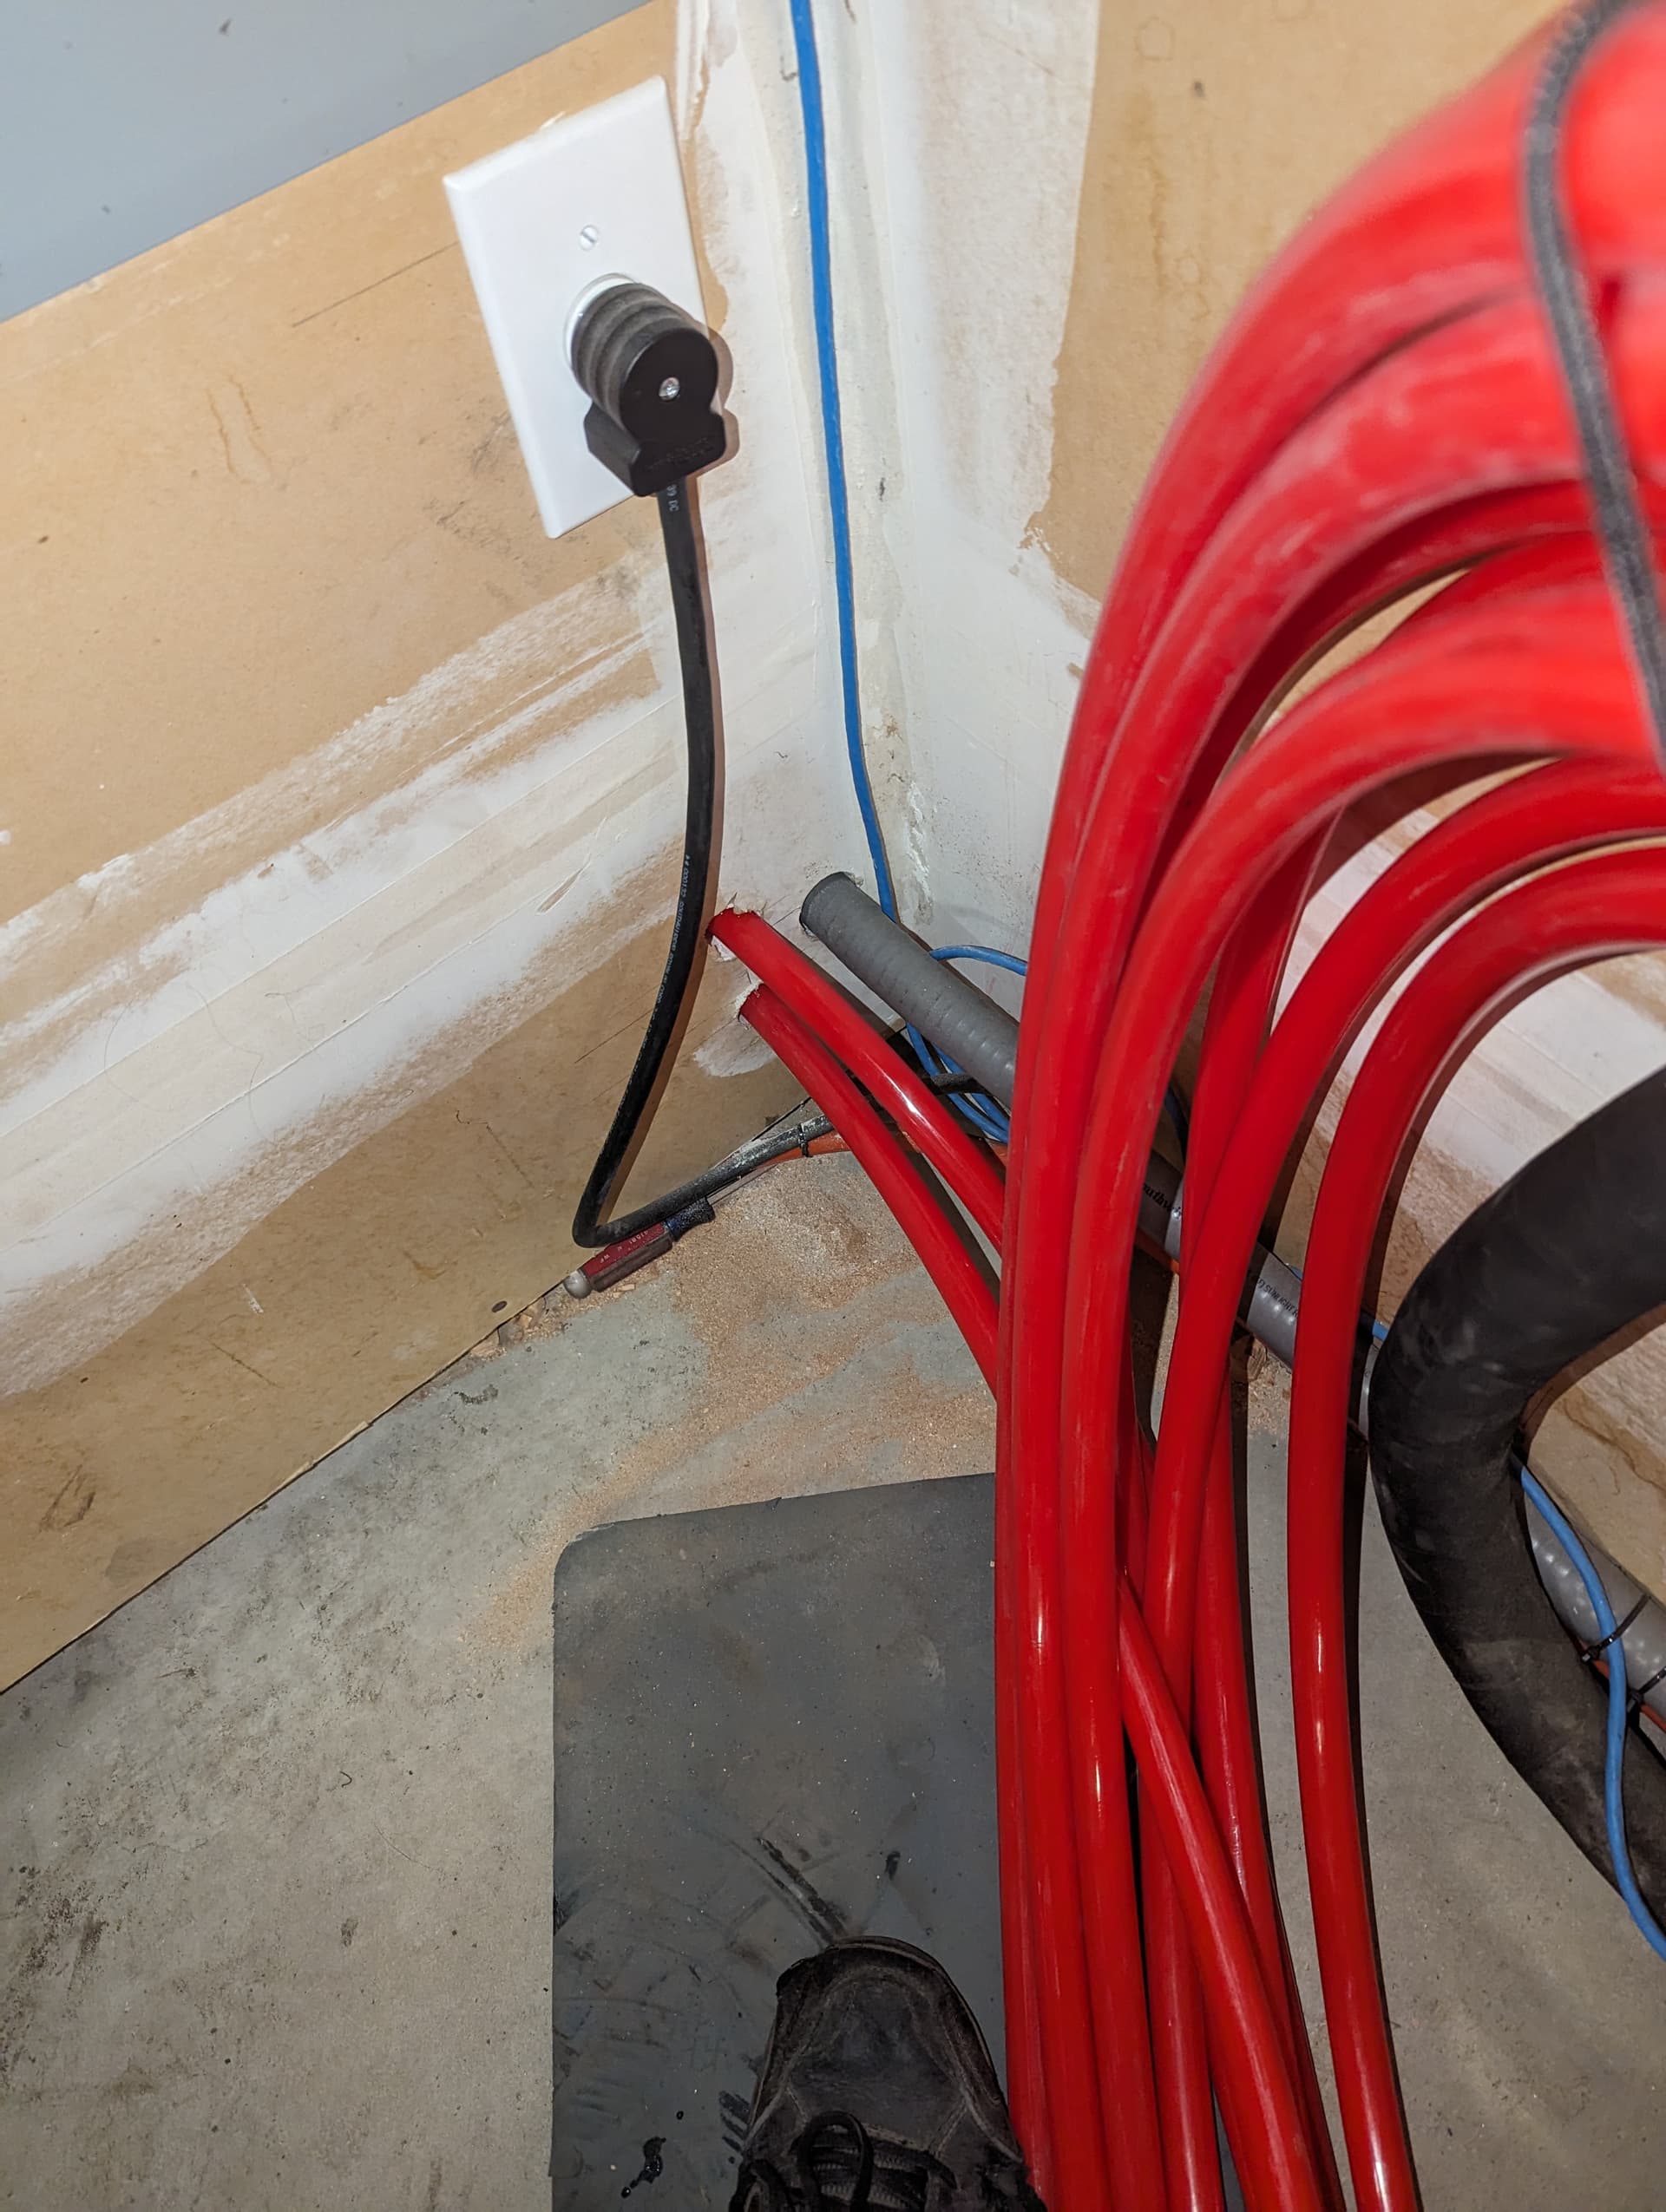
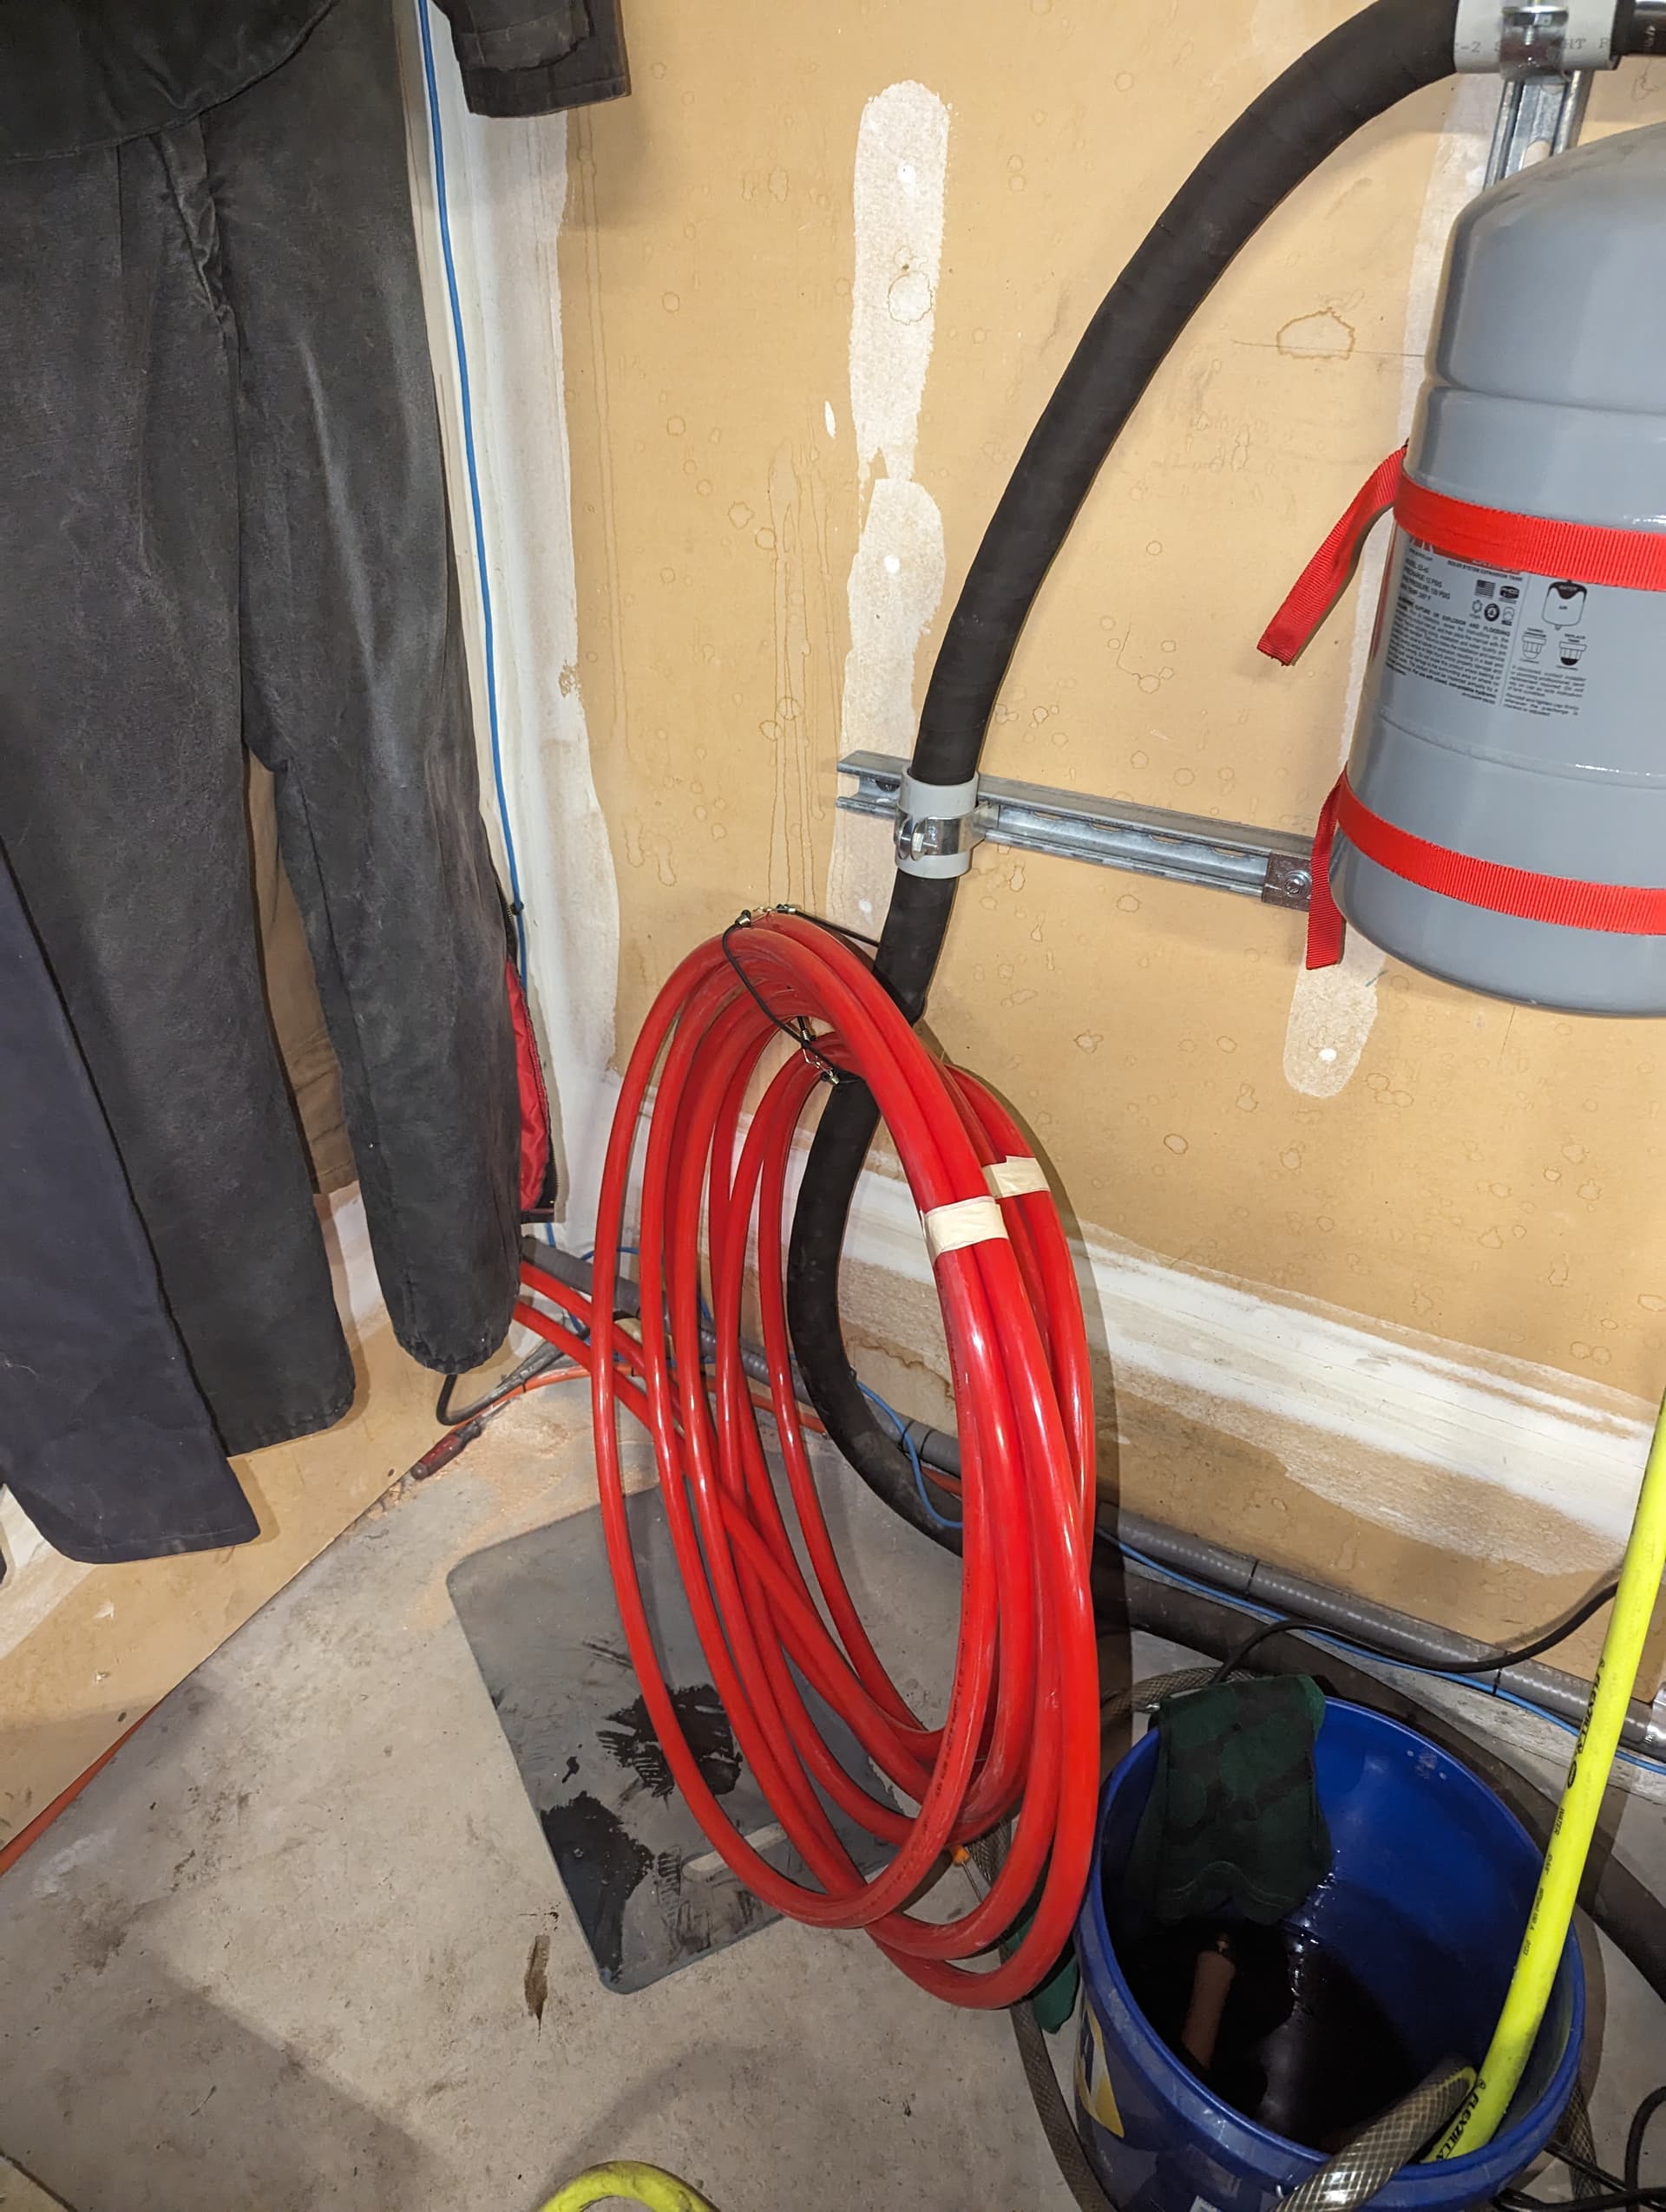
Update from the weekend and yesterday’s work. I wrestled with the pex in the crawl space (it coils) to get it through 1" holes that feed into the garage where the miners reside and the distribution system will be.

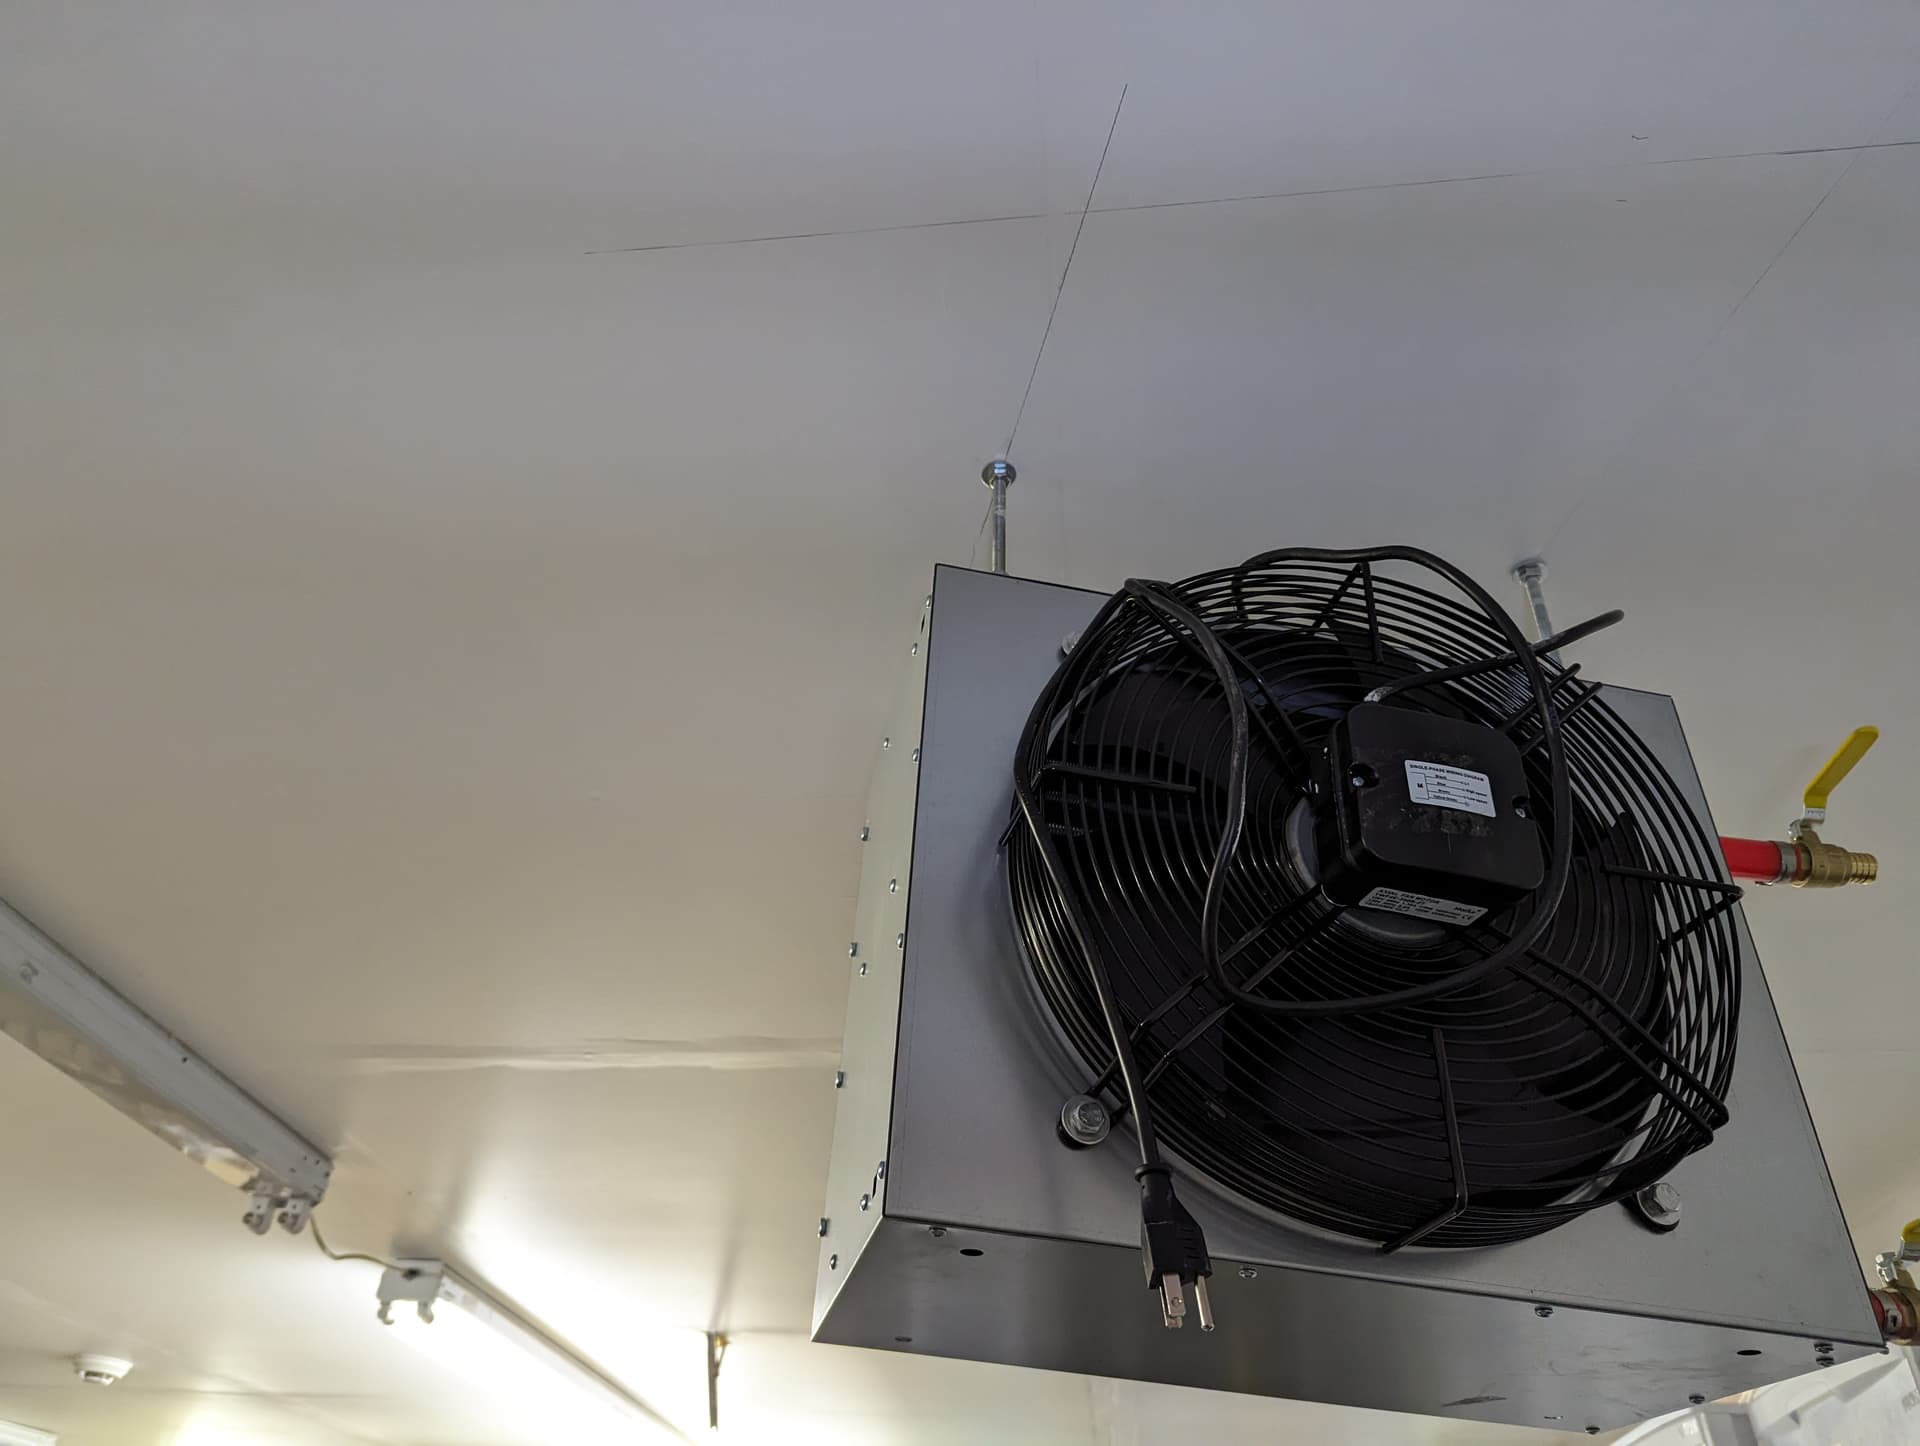
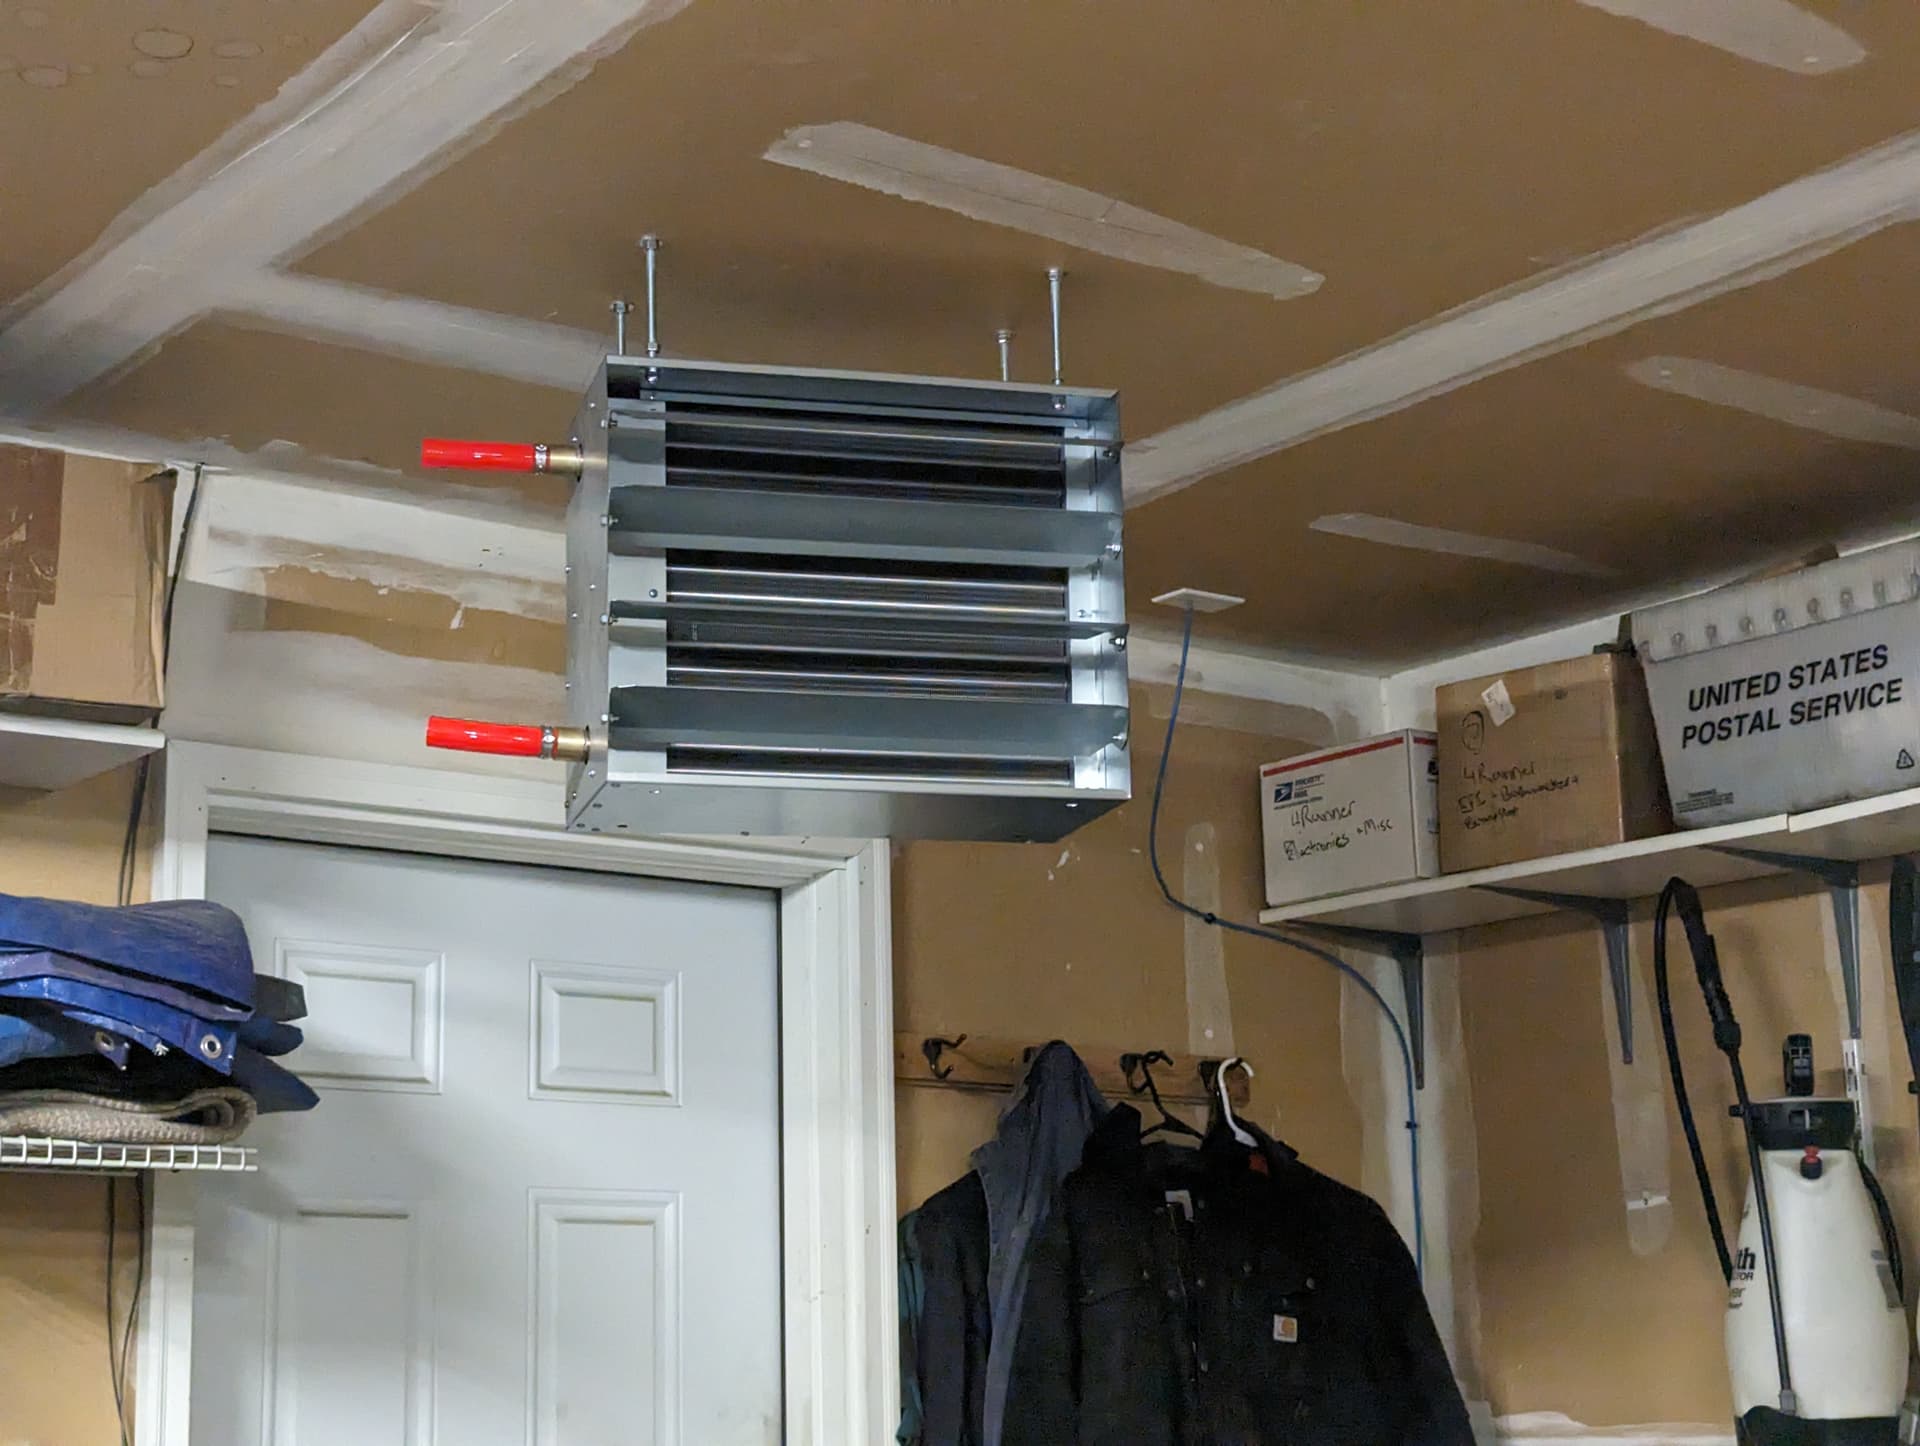
I got the mounts built for the hanging hydronic heaters. I ended up going with 2x4s across the top of the trusses instead of screwing into them from the bottom/garage side. Once everything is all hooked up then I’ll climb back up there and tack them down with a 2" screw just to keep them from moving at all.

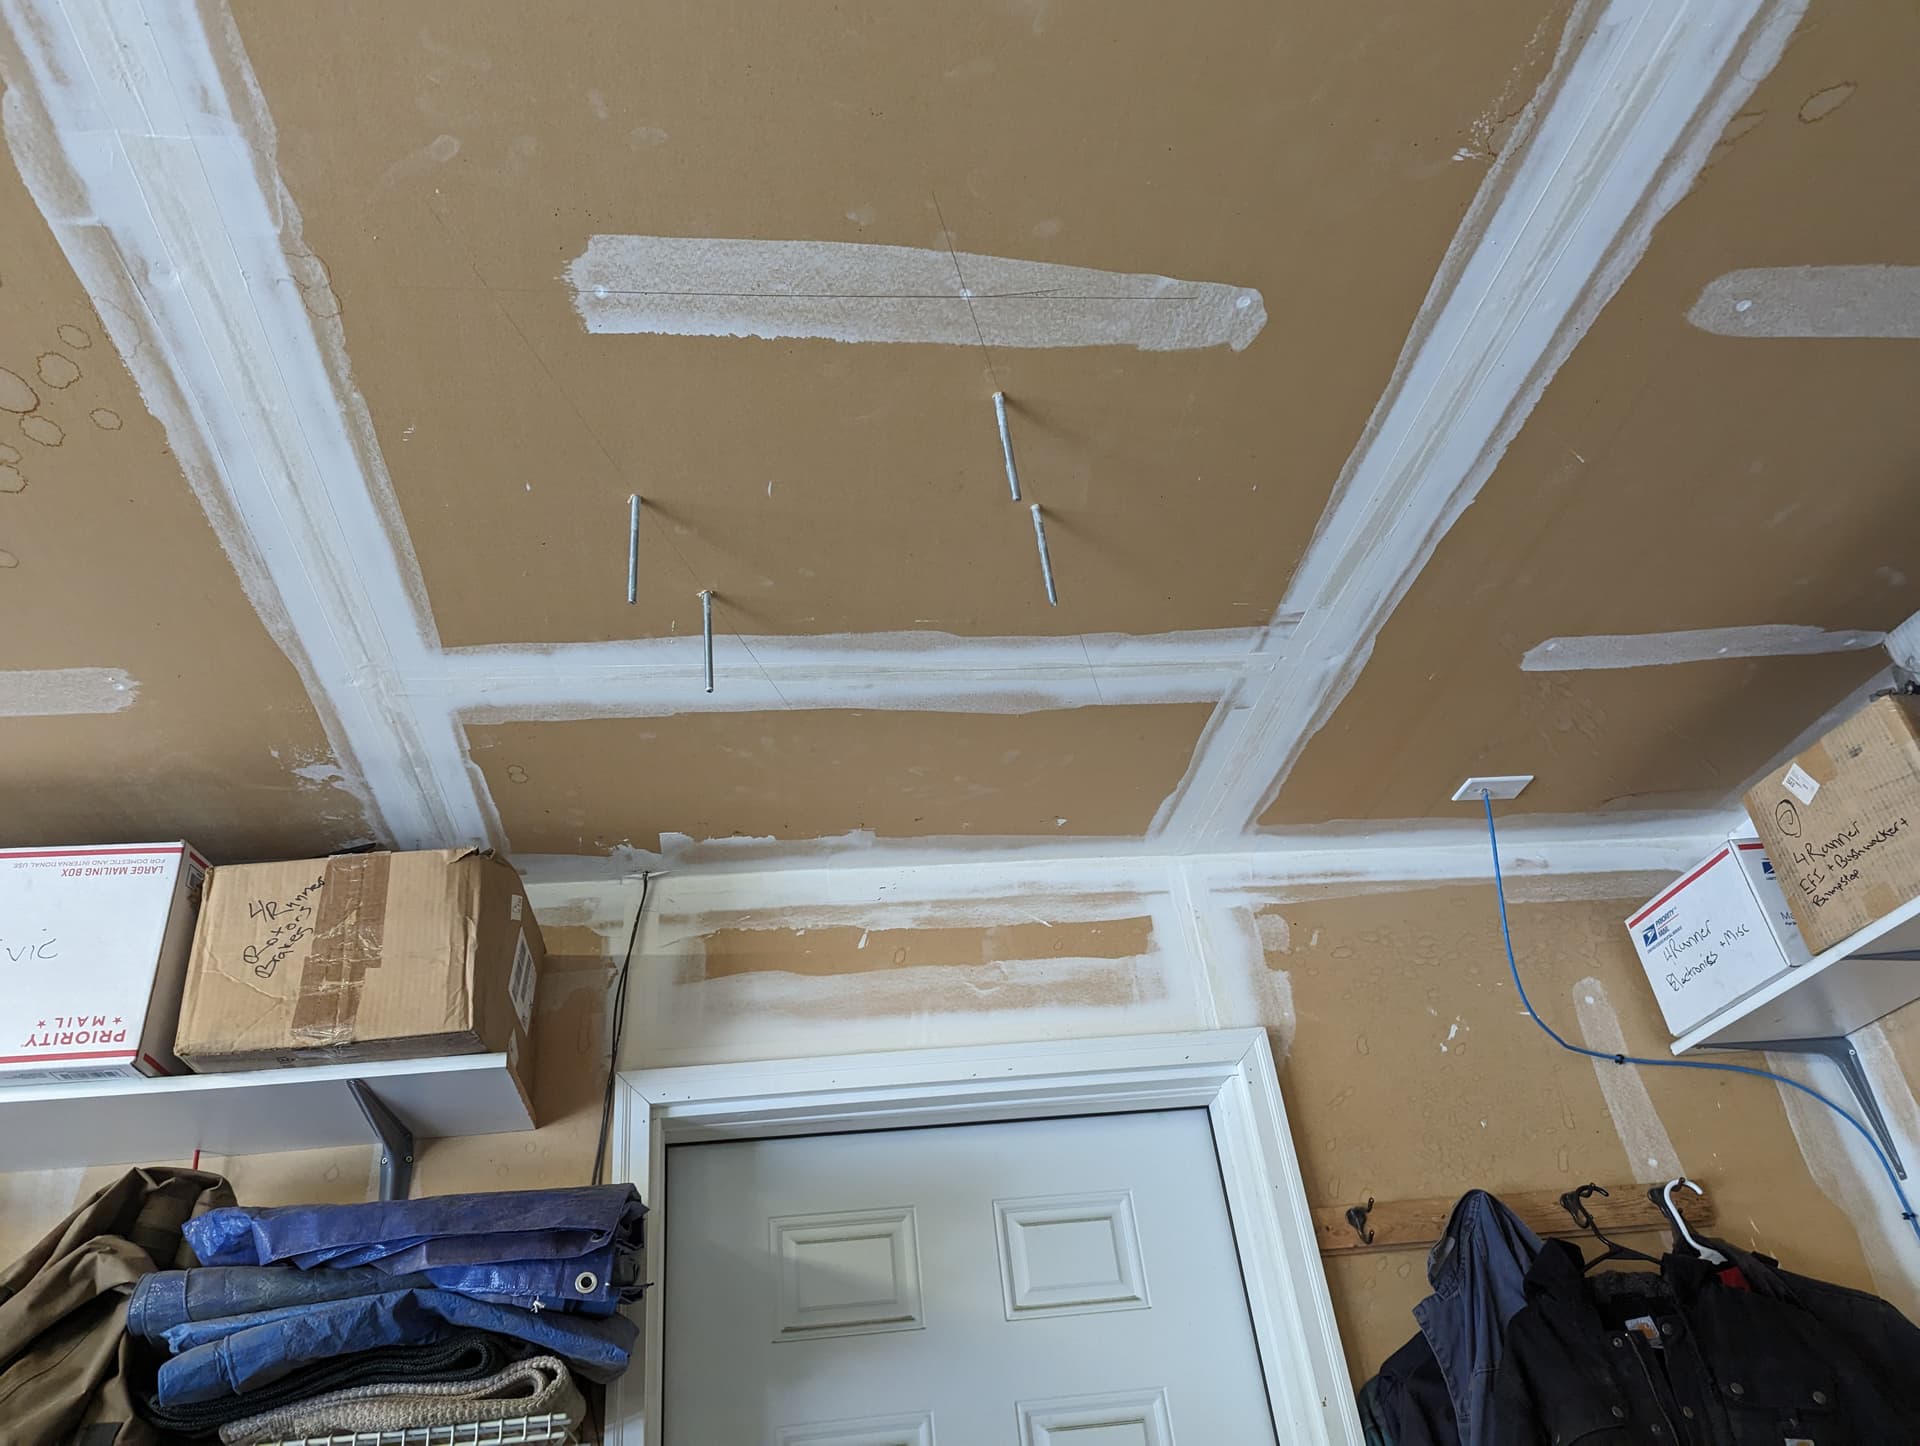
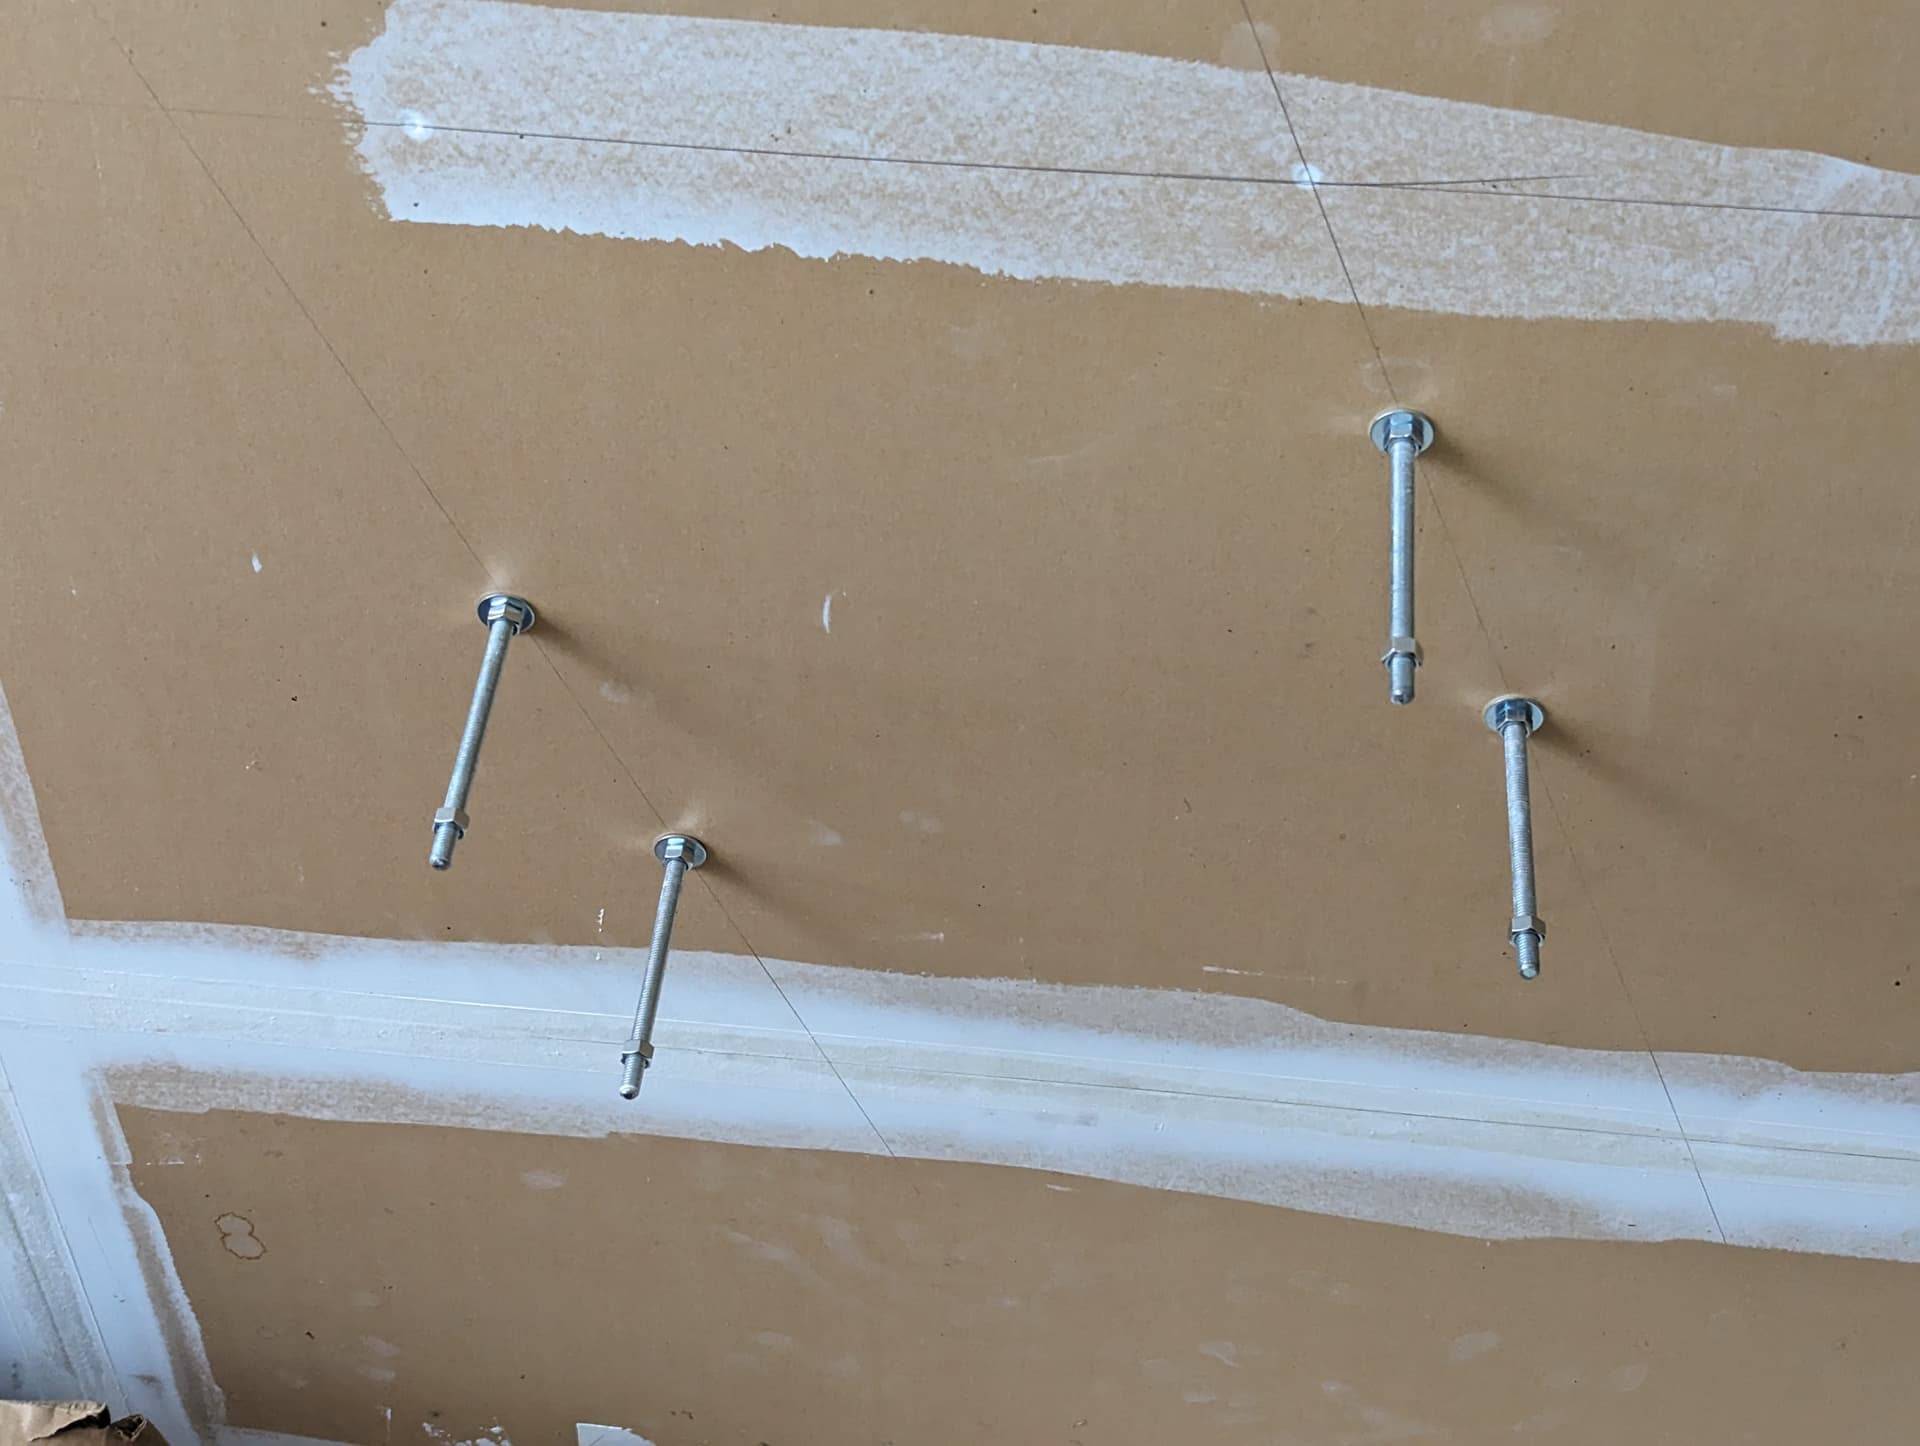
I added the washer/nut against the drywall to give it cleaner look and provide a tad bit of stability as well. I doubled nutted above the heater on the all thread so I could tighten the nylock nuts on the hydronic heater side without turning the all thread.
I ended up ordering some pex crimp tools. The apollo ones I got at HD were absolutely garbage. I got the ring crimp style this time. I’ve been told by a tradesman that he never sees these crimps fail and the crimps are way cheaper locally as well. Win win.
I did pressure test both hydronic heaters and neither had a leak. Granted this was a very short term test and pretty much looking at my sweat joints.
Next up is to work on some pex work for the hydronic heaters and find some good clamps or something I can print to hold them to the wall. the 1" is way stiffer than the 3/4. It ought to be interesting to get it to look decent.
1 Like
Not a whole lot happening. Finished up the plumbing on this guy. I’ll need to crimp them when the crimpers show up tomorrow. I will also remove these and blow air through them to clear any debris before crimping. I think it turned out decently. I can’t wait to start pushing water through these things!

3 Likes
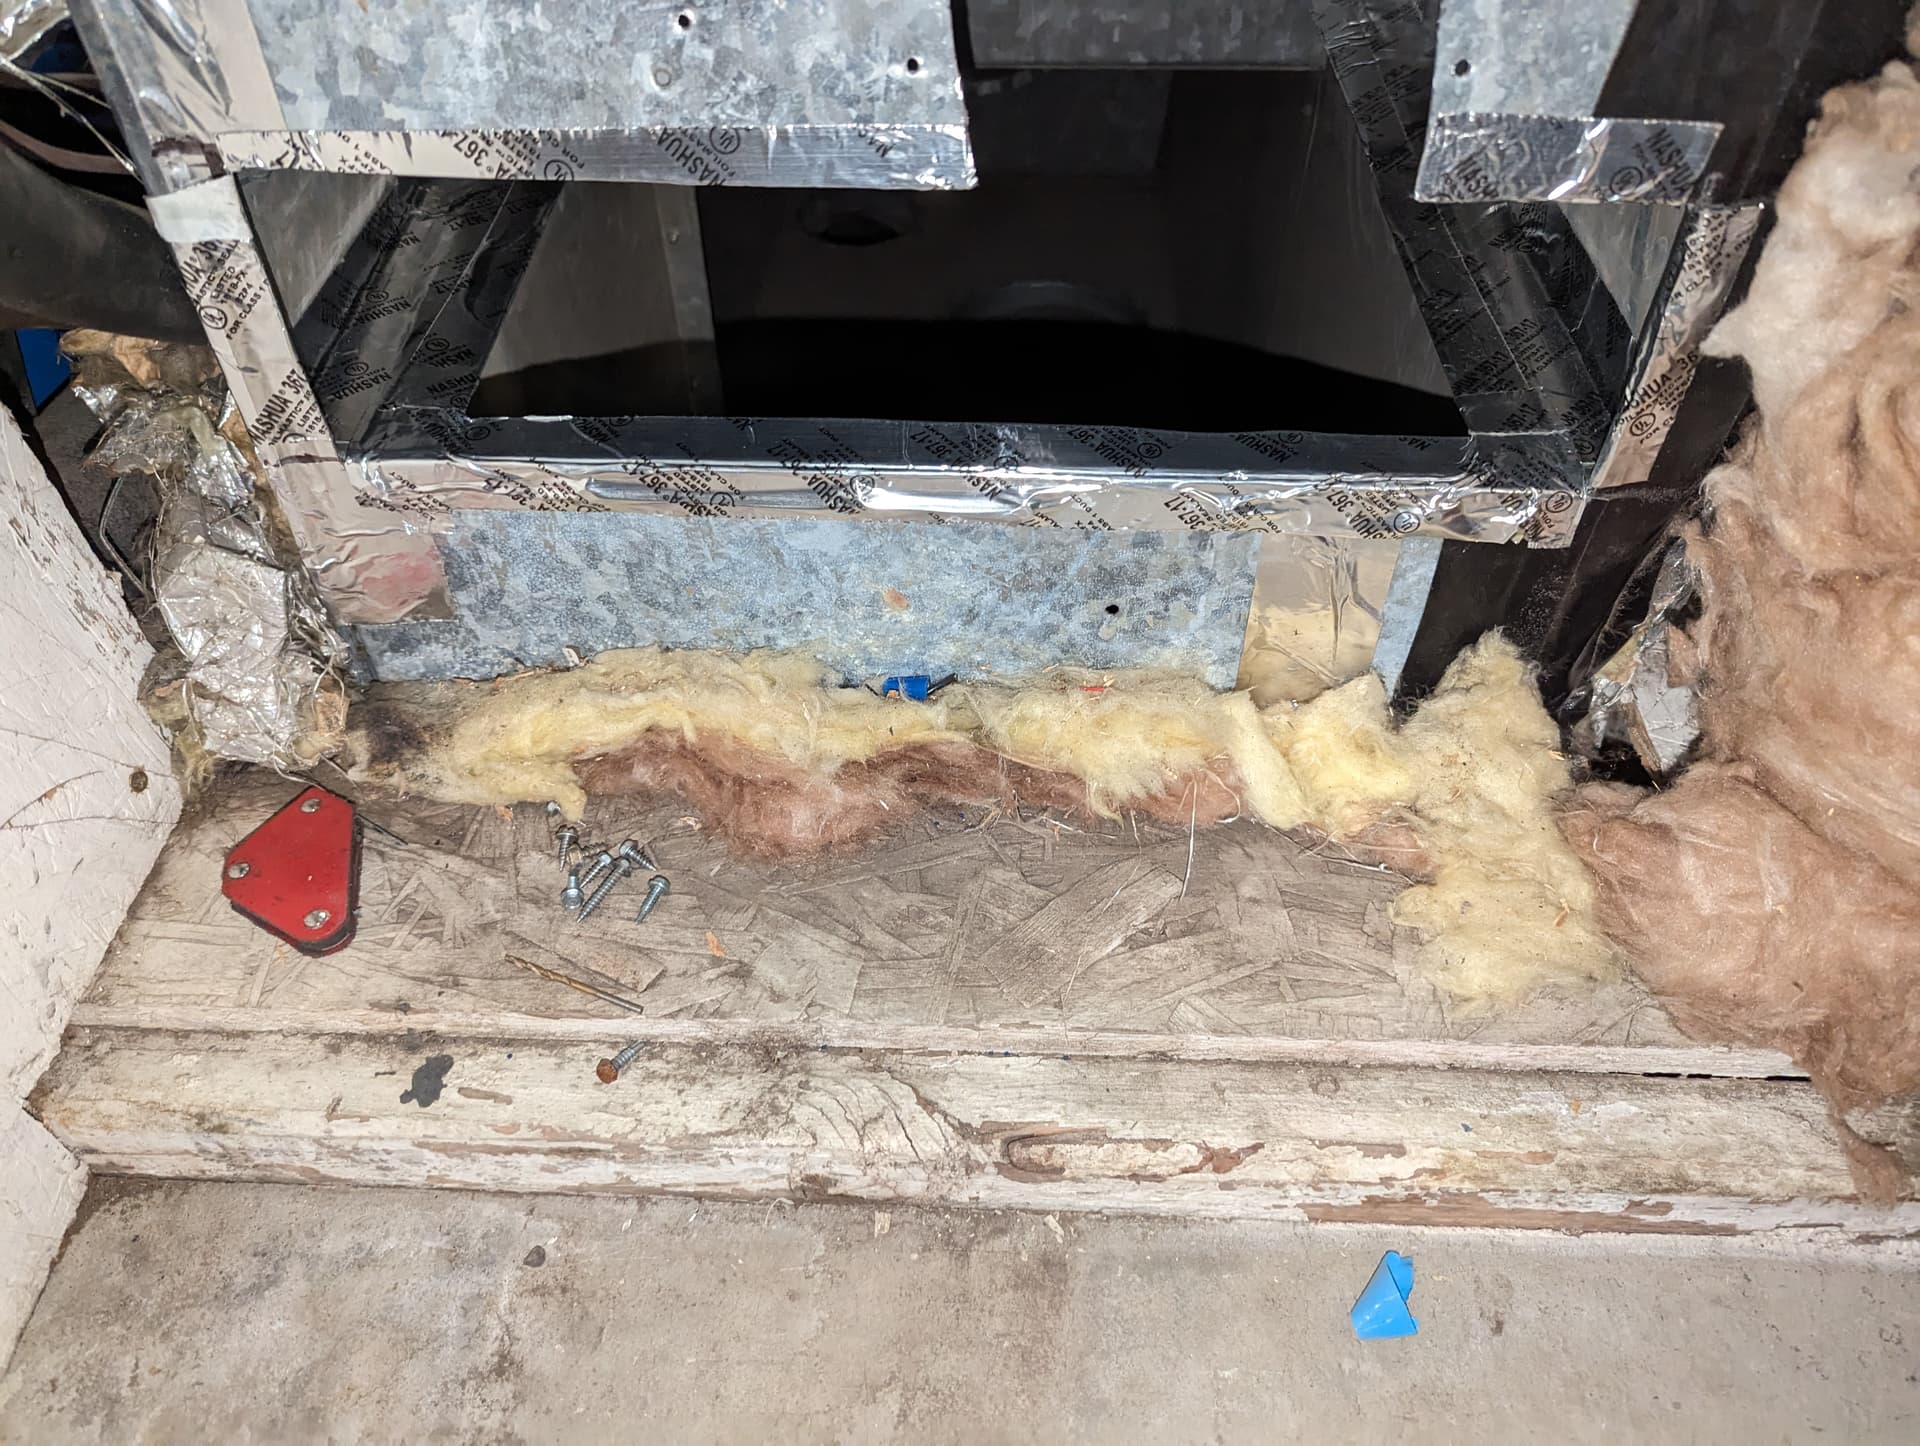
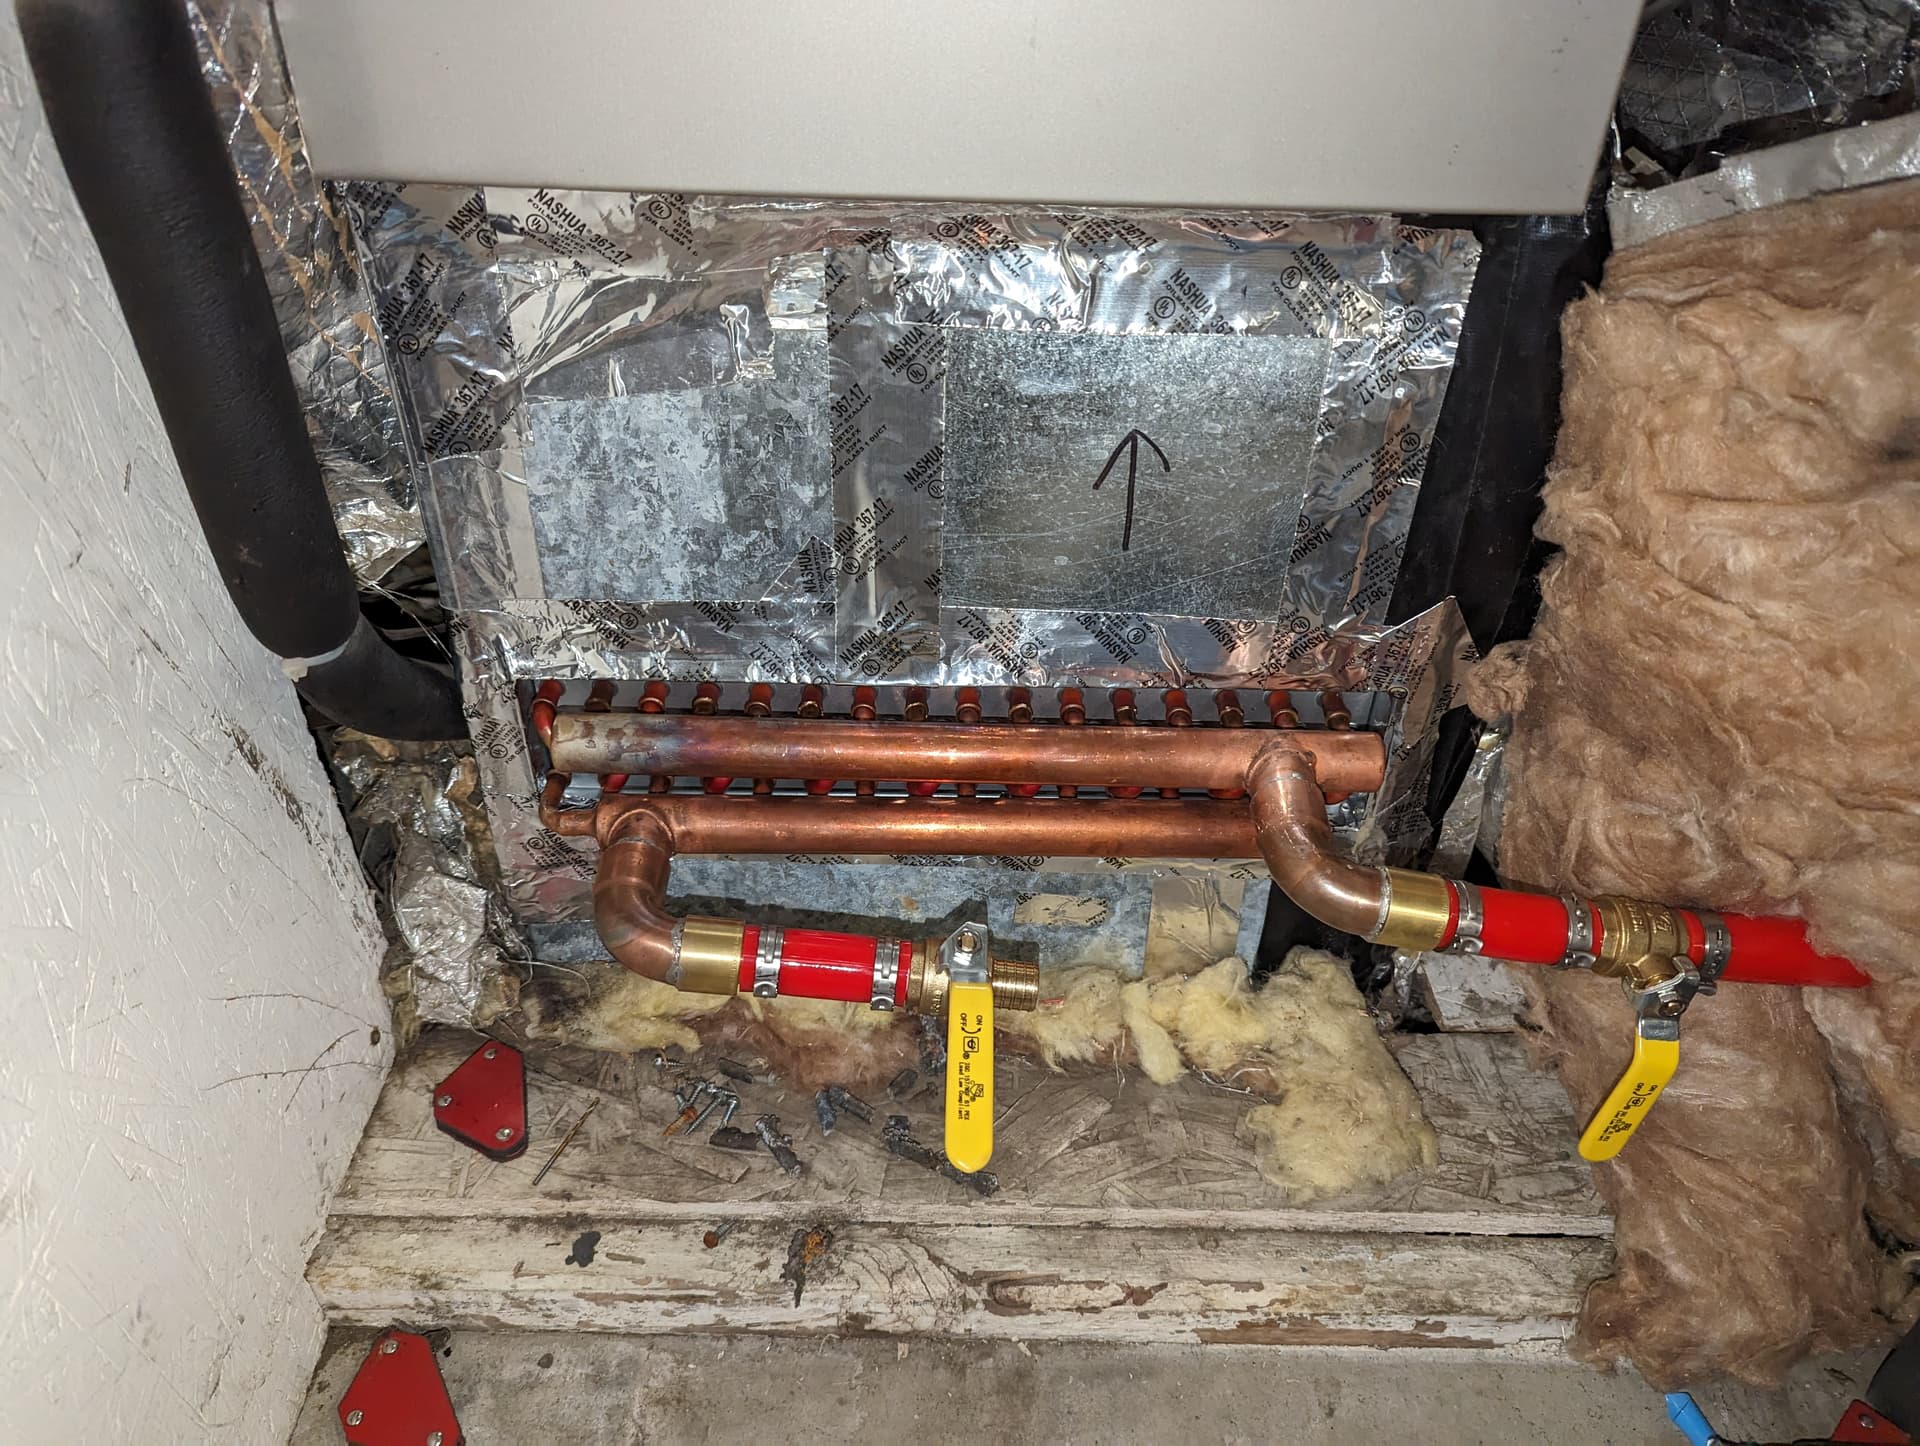
Got some good work done last night. I bent some galvanized flashing I had to create this mounting “shelf” inside the output duct of the air handler. Ignore the arrow. It is simply an orientation for the way the cover plate screws on and not the airflow direction. I found some mastic aluminum ducting tape. It’s way better than the normal stuff.
Ignore the hole above my rectangle cutout. That was there from someone else. I think they may have had a fresh air intake installed here and it was later removed.

1 Like
Love seeing the build come together…all that hard work will pay off!
1 Like
@HBIM_Channel Thanks! The real fun will be in the “refinement phase” where I add in a control system and full data logging for temps and pressure everywhere that makes sense. I may look at a PLC for this. I don’t mind programming and they’re fairly easy to program and they’re rock solid.
1 Like
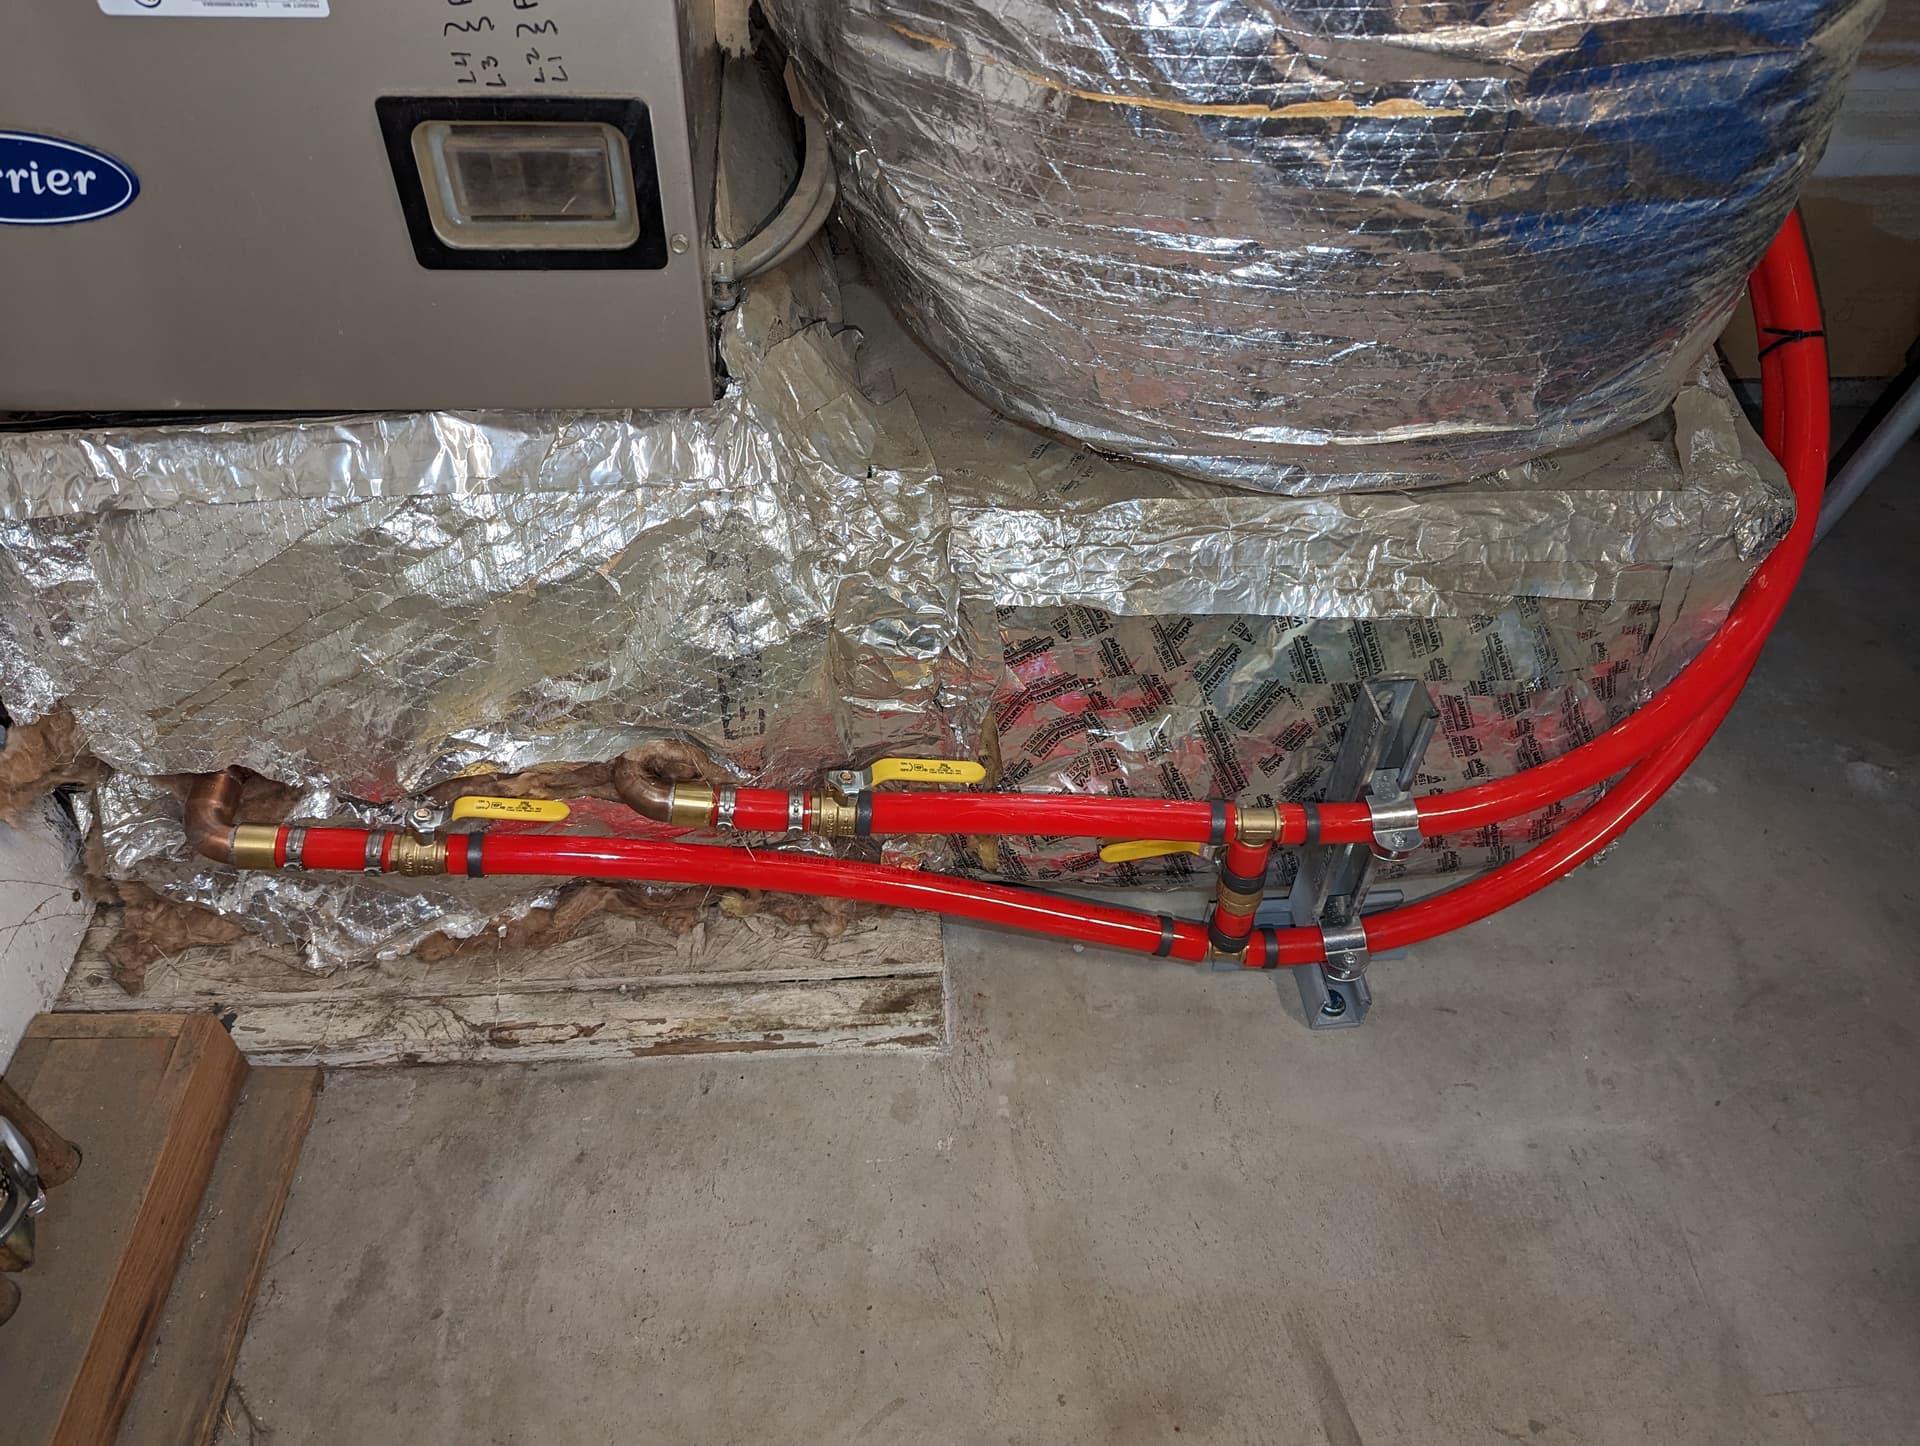
Another good day of work. I decided to take the pex up into the attic and then I’ll go back down through the ceiling where the manifolds will be. I fabbed up a little bracket to be bolted to the concrete because it takes quite a bit of effort to manipulate the 1" pex and I didn’t want to strain the manifold on the exchanger.


1 Like
hey I have a question If someone knows. If emersion cool my 2 S19XP can I run S19 XP Hydro firmware.
Not sure. You may have better luck opening a new thread. I would say that if the chip count is different then it is unlikely. There is no need to run different firmware though. Simply put a fan spoofer on and it’ll work just fine. Mine have been running that way for roughly 6 months.
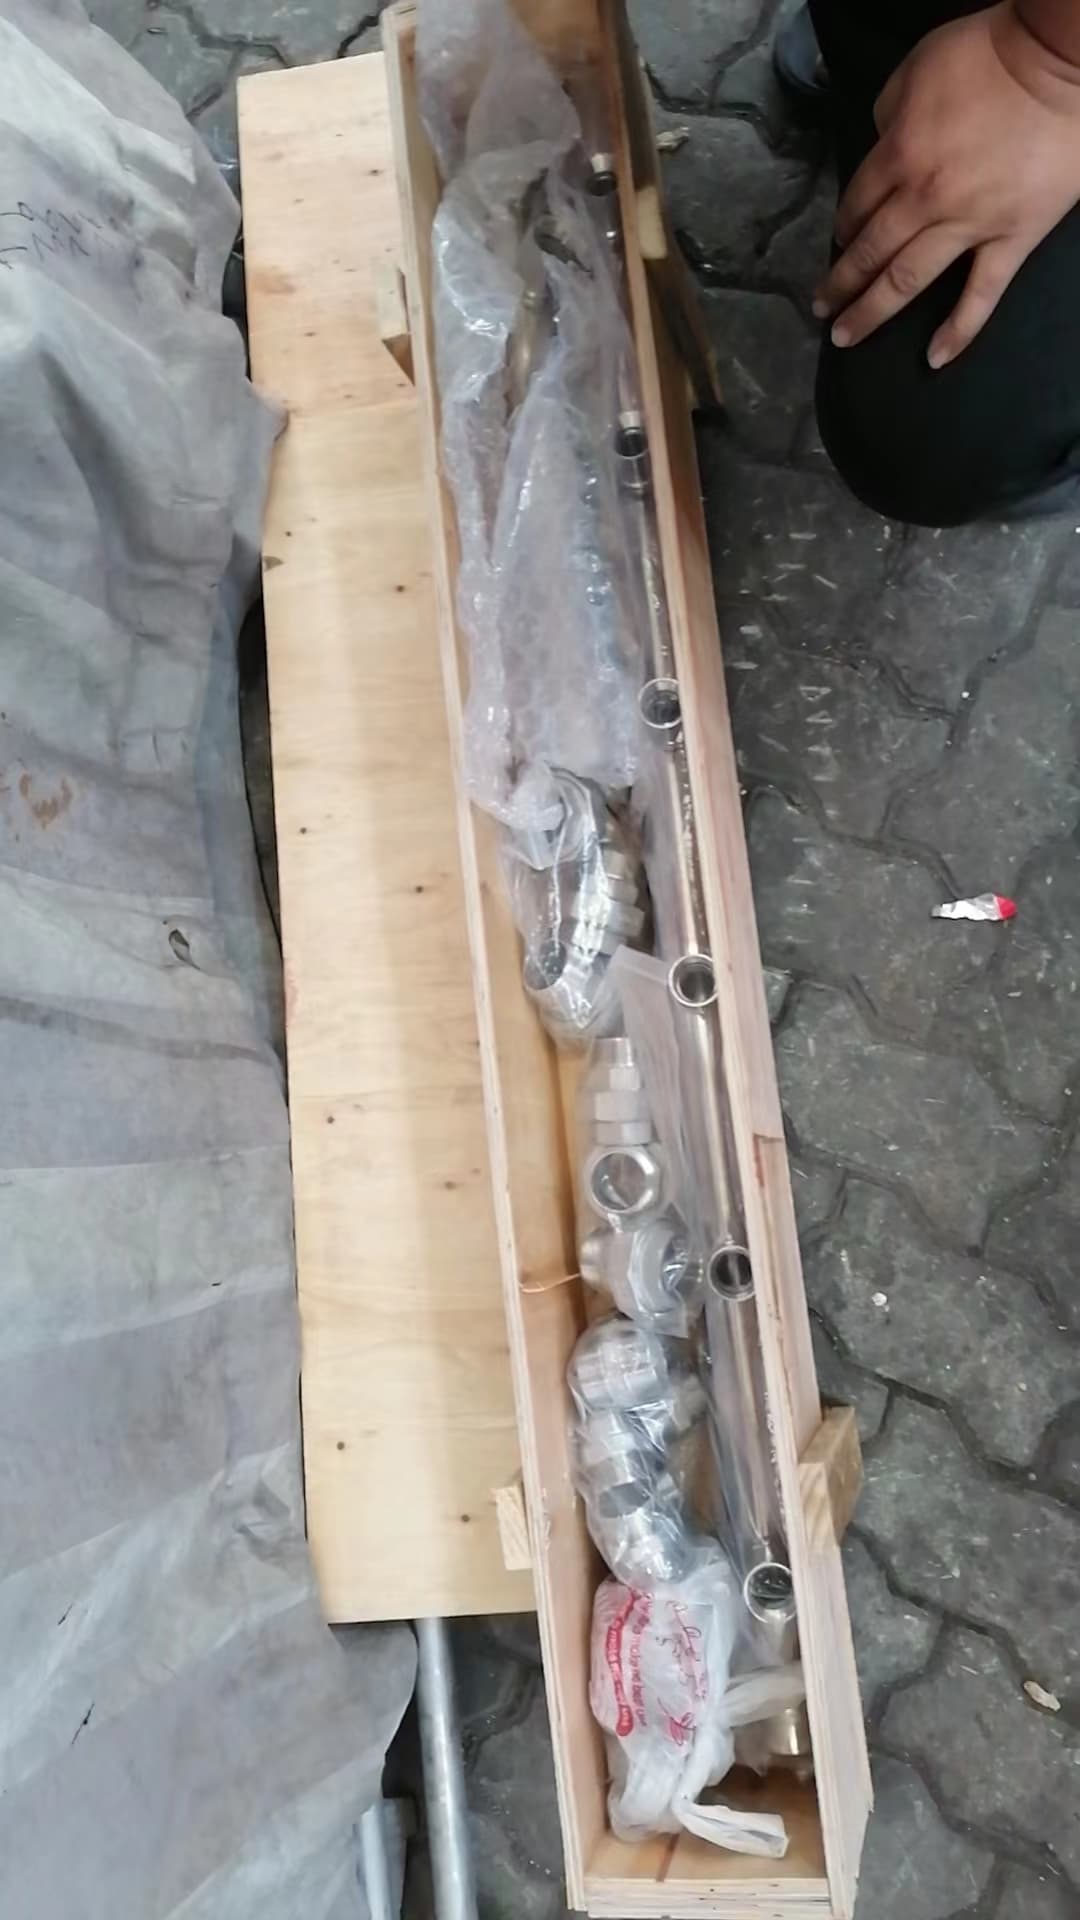
The manifolds are finished! I should have them in hand late next week. I’m hoping for NEXT weekend (not this coming one).
Derek at Fog Hashing has also helped source the majority of the rest of the fittings. I’d imagine those will be done very soon as well.
I should be able to be completely ready by the time all of those items show up. I think is all I have to do is flip one of my hanging exchangers around, crimp fittings (crimpers came in yesterday), and put up some plywood/osb on the wall where the manifolds will be. I noticed I can reverse it so the ports can be on the opposite side.
1 Like