Hive OS Official Thread ✔️

Hello everyone!
Welcome to Hive OS official thread! :beers:

We will collect here Guides, Step-by-step tutorials, lifehacks on how to mine and manage ASICs and GPU efficiently.

Would you like to discover how to overclock your workers safely and profitably?
Or how to manage a large farm in a few clicks?
We will answer these and many other questions here and on our Blog or check our
KNOWLEDGE BASE

Hive OS
an ultimate operational system for managing and monitoring your GPU rigs and ASICs. Using it, you can monitor up to 200,000+ workers from a single dashboard and from anywhere in the world.

Hive OS ensures high stability of the equipment — your workers will function with no sudden interruptions.
It constantly monitors the “health” of your workers and provides you with a warning in case one of them is infected with a virus. You will be able to react quickly, so one infected worker won’t infect the entire farm. Besides, Hive OS allows automatic fan control and multi-user access. We regularly add new features, so the system is getting better all the time.

Hiveon ASIC
is a custom firmware that can move your ASICs to the next level of performance. It can help you to reach a higher hashrate, decrease energy consumption, protect your devices from viruses, prevent their damage and protect them from short circuits that can be caused by manufacturing defects.
:gift:Hive OS is free for users of Hiveon ASIC firmware.
DOWNLOAD HIVEON ASIC firmware FOR FREE

Hiveon Pool
PPS+ payout model
No commission.
Moreover, we cover all the transactions. To make your mining as effective as possible, we have also located the servers of the pool around the world: in North America, Europe, Asia and Russia.

Would you like to learn more about our products? Then check our official website or get in touch with our multilingual support team.

Happy mining!

4 Likes

Let’s start our Guides adventure from the answer to this question:
HOW TO CHOOSE ASIC in 2020: what to pay attention to.

What criteria to consider in order to choose devices that will ensure income and will be not too difficult to operate at the same time?

Energy efficiency and overclocking

Your income and the payback speed of the device directly depend on the hashrate that can be achieved on a specific ASIC model, and the cost of electricity. Therefore, choosing ASIC, be sure to check the combination of overclocking profiles and consumed electricity, try to find the most profitable option.

Besides, after purchasing the device (or devices), we highly recommend to install Hiveon ASIC firmware. Using it, you will be able to do one of the following:

  • List item
    To reduce the energy consumption and to keep hashrate at the current level;

  • List item
    To increase the hashrate and to keep the energy consumption at the current level;

  • List item
    To maximize the hashrate and to increase the energy consumption.

For example, stock firmware of ASIC Antminer T17 allows reaching only 40TH/s, and at this rate the device consumes 2200W. At the same hashrate, ASIC with firmware Hiveon ASIC T17 will consume only 1816W, and the maximum hashrate on a standard PSU will be 56TH/s.

Spare parts

Spare parts availability is another important factor affecting the choice of ASIC. Is it possible to get spare parts in your city or at least the country? How expensive are they?

We recommend choosing those ASICs for which you can get spare parts as soon as possible (the most popular manufacturer is Bitmain). Thus, in case of a breakdown, you will be able to solve the problem quickly and to avoid long pauses in mining on this particular device. Note that ASICs have virtually no interchangeable parts. Exceptions include fans, but everything depends on their size. For example, Bitmain devices have the same fans, but fans of Innosilicon are bigger. The control boards for the entire 17th Bitmain series, S17 and T17 are also interchangeable.

Warranty

Be sure to check the conditions of the warranty service. First of all, pay attention to the term: the longer the warranty is valid, the better. Also, find out which cases are not warranties for your potential ASIC.

Besides, discover if your city (or country) has a warranty service center. If not, look for the post-warranty one. Please note that it is sometimes easier and cheaper to use the services of a post-warranty center. Warranty repairs can take much more time, which means downtime of equipment and loss of income.

Management

The simpler the ASIC is to manage, the more attention you can pay to the mining process itself (instead of being regularly distracted by various settings). We recommend you to consider primarily those models that can be “combined” withHive OS. Thus, you will be able to manage your devices remotely, to monitor the condition and performance of ASICs from a single dashboard, and so on. Hive OS supports numerous models: Antminer, Innosilicon, Whatsminer, and so on.

Affordability

The cost can be a decisive factor when choosing equipment, especially if you plan to purchase several tens or hundreds of ASICs at once. Typically, the price of a device directly depends on its performance.

Do not stop at one supplier: compare at least several companies. Some suppliers increase the price on purpose, so without checking the offers of other sellers, you risk spending much more than you actually need. We also recommend you not to buy new ASICs immediately after they are released — during this period their price will be maximum. It is better to wait for a while. Their cost will decrease slightly and, in addition, you will be able to read reviews about new equipment and determine how it suits you.

Remember that it is also worth paying attention to how much energy the ASIC consumes on the terahash. For example, some devices consume 1.6 kW and others — 6 kW. An ASIC that consumes 6 kW will end up being much more expensive than that one that needs only 1.6 kW, because you will spend most of your income on paying electricity bills.

Rating of highly productive ASIC models in 2020

Bitmain Antminer Т17 (old generations)

  • One of the most reliable and durable devices
  • Break seldom
  • Easy to overclock
  • Is compatible with Hiveon ASIC — on standard PSU it is possible to reach 56TH/s (when using the firmware and operating the ASIC properly, the service life of the device can be increased by 1 year)
  • Control boards of the 17th series are interchangeable
  • Bitmain fans are interchangeable

Bitmain Antminer S17 Pro

  • High reliability
  • Break seldom
  • Easy to overclock
  • Is compatible with Hiveon ASIC firmware — on standard PSU it is possible to reach 80.1TH/s
  • Bitmain fans are interchangeable
  • Gives way to Т17, but is still better than other devices

Innosilicon T3

  • Enhanced cooling system
  • High reliability
  • ASIC Boost is already included
  • It’s possible to reach 43TH/s

Whatsminer M20S

  • High reliability
  • High efficiency
  • It is possible to reach 68TH/s

It is most likely that in the next six months or a year ASICs will increasingly displace rigs on video cards from mining, so it makes sense to look at them now. Also remember that the ASIC’s stock characteristics are not the limit. Its performance (and, accordingly, your income) can be increased with the help of the Hiveon ASIC firmware. It will also help to reduce energy consumption.

In case you have any questions, ask us in the comments below.

2 Likes

Do you guys have support for the K5 yet?

1 Like

This interested me too. Would love to be able to underclock my K5

1 Like

quite useful, running S17 Pro now

There is no support. If you give access, we can see if support is possible. If possible, we will add. :ok_hand:

There is no support. If you give access, we can see if support is possible. If possible, we will add :soon:

so Jminer would have to let you access his miner to see if you can add it to HiveOS?

1 Like

Send us email with it bee@hiveos.farm

Prepare your ASICs for hot summer days

Quite hot, yeah?

Yes, we know how in summertime the outside temperature can reach and even exceed 40°C. This is dangerous for ASICs, as they are generating heat by themselves. As a result, ASICs’ chips may get damaged, which will affect the hashrate, the lifespan of the devices, and your income. To keep your equipment and money safe, follow our recommendations on how to prepare your ASICs for hot summer.

Monitor the temperature

Tracking the temperature all the time is essential, and Hive OS can significantly simplify this process.

First of all, you can monitor the temperature of all your ASICs at the same time — this is possible thanks to the heatmap.

You can see the temperatures across all your workers.

If one of the devices reaches the critical temperature, it will get red on the map, and you will notice this quickly even if you have hundreds of ASICs. The default threshold value for ASICs is 85°C. You can change it in the farm settings, but remember to avoid values higher than 90°C . They are too dangerous for ASICs.

Secondly, you can set up notifications that will keep you informed about dangerous temperature increases even in case you get distracted from the heatmap. The notifications can be sent to Discord or Telegram. It works like this: if the temperature of your device exceeds the threshold value by 3°C (so your device heats to 88°C), you receive a message informing you about it. The critical value of 85°C can be changed — click the thermometer icon to do this. However, we don’t recommend doing this, as changing this limit may be dangerous to your ASICs. If you still decide to change it, keep in mind that you are doing this at your own risk .

Keep the temperature under control

Hive OS will help you not only to monitor the temperature of your ASICs — it will also help you to keep it under control and protect your devices from overheating. This is possible thanks to the autofan feature. To enable it, follow these steps:

  1. Log in to your Hive OS account;
  2. Click the fan icon in the top right corner;
  3. Change the following fields, if necessary: target temperature, minimum fan speed, and maximum fan speed;
  4. Move the slider in order to turn the autofan on;
  5. Click “Apply”.

That’s it, the temperature of your ASICs will be maintained at the desired level. Please note that the recommended temperature for ASICs is 75–80°C.

However, if the critical value is somehow reached, another useful Hive OS feature comes to the rescue: a temperature watchdog. It reboots the system or stops the mining process to prevent the damage of the equipment. To set it up, click the fan icon one more time and specify the critical temperature and action.

Hiveon ASIC firmware is also equipped with a temperature watchdog. It prevents the chips from falling below the critical value and stops the mining process in case the temperature gets too high. Besides, unlike other firmware, Hiveon ASIC has no quiet start feature. The reason for this is that during the quiet start the temperature sensor is not working, so an ASIC can overheat and even burn down.

By the way, Hive OS is free for Hiveon ASIC users.

Decrease the power consumption

Decreasing power consumption will also help to prevent the risk of overheating. You can do this using the Hiveon ASIC downvolting feature. When setting up properly, it can reduce consumption by around 1,000 kW. As an option, you can combine overclocking and downvolting. Switching between these two modes can be done automatically with the help of the Hive OS scheduler.

Ensure the air movement

One more way to simplify your ASICs’ life in the summertime is to ensure the air movement in the room where they are located. First of all, open the doors and windows. Secondly, don’t place your devices too close to each other — leave some space between them. Thirdly, get a fan (or even several fans in case you have a lot of ASICs) and make sure the air flow it creates moves to the open door or window. In this way, a fan will remove the extra heat from the room.

Remove the dust regularly

An ASIC full of dust has much higher chances for overheating than the clean one. Therefore, we recommend removing the dust not only in summer, but on a regular basis — at least once a month. In this way, you will prolong the lifespan of your devices.

The most effective way to remove the dust is using an air compressor and an air gun. The air pressure should be 0.7 (+/- 0.05 MPa). Don’t forget to shut down the ASICs before cleaning! As soon as everything is ready, use an air gun to carefully blow the fans a couple of times. Then, put the gun close to the fun (but make sure it doesn’t touch the grille or blades) and blow every gap for a couple of seconds. Repeat this step two or three times. In case the dust is stuck and cannot be blown out, remove the fan and simply brush the dust out.

With Hive OS and Hiveon ASIC firmware, your equipment can easily survive the hot summer — just follow our recommendations carefully.

2 Likes

Do you have any other features to control overheating? Except these ones?

one more useful feature that will help your devices to survive the hot weather is Schedules. You can use it to do the following:

:white_check_mark: Switching to the coins that don’t require too much energy to be mined — this will allow devices to produce less heat, so the risk of overheating will be decreased.

:white_check_mark: Applying different overclocking profiles to regulate the heat release. For instance, at night, when the outside temperature is usually a bit lower, an overclocking profile can be increased (and vice versa for the daytime).

:white_check_mark: Stopping the mining process during the daytime, when the outside temperature is too high (if the alarm clock is set on the motherboard).

With the Hive OS schedules, all these actions can be done automatically. You only have to set up everything once, and that’s it — your devices will switch to different coins and profiles without your participation.

1 Like

Why did y’all start charging people with less than 4 rigs for a few days? It has gone back to free but for a couple of days I was being charged and now I have a negative balance.

one day I was charged .05 cents USD per rig and the second day I was charged .02 cents USD.

1 Like

Hi, can you create a ticket to our support, mail us please bee@hiveos.farm

How to manage ASICs and GPU rigs efficiently with Hive OS

You have installed Hive OS on your workers, created a farm, set up the access levels, and are ready to start mining. But how to manage workers efficiently, set up different access levels, monitor hashrate, energy consumption, temperature, online/offline statuses and errors of each miner across the entire farm if you have hundreds or even thousands of devices?

Hive OS has a solution suitable both for ASICs and GPU rigs: Flight Sheets.

What is a flight sheet?

Flight Sheets are configuration files or, more simply, sets of settings for your workers. Using them, you can create any number of combinations of wallets, coins, pools, and miners to apply them to your devices and mine efficiently. Switching between flight sheets takes only a few clicks.

In Hive OS you can create as many flight sheets as you want, and they can be applied both to specific workers and in bulk which is very convenient if you have a lot of devices.

How to create a flight sheet and start mining?

Creating a flight sheet is a very easy task. Just follow our guide.

Step 1: creating a wallet

To create a flight sheet, you should, first of all, make sure that you already have a wallet. If no, you should go to the Wallets tab and click the Add wallet button. Then, you will only have to fill the following three fields:

  • Coin — in the dropdown list, select a coin that you are going to mine;
  • Address — add your wallet’s address;
  • Name — add your wallet’s name. It’s better to choose a special name that will make this particular wallet different from other wallets. For instance, Ethereum on Claymore.

After this, click the Create button. That’s it! Your new wallet is saved, so now you can use it for your flight sheet (or sheets).

Step 2: adding the main flight sheet data

Go to the Flight sheets tab — it is located to the right of the tab in which you created the wallet. There you will see the following window:

To create a flight sheet, you will have to fill the following fields:

  • Coin — select a coin from the dropdown list. Please note that this field must be filled first — otherwise other fields will remain unavailable. This is done for your convenience. As soon as you select a coin, the lists of wallets, pools, and miners will be adjusted to your choice — only those options that are associated with the selected coin will be available to you. Thus, you will create a flight sheet correctly — you will simply have no chance to make a mistake.
  • Wallet — choose a wallet for your flight sheet. Remember that not all the wallets you created will be available in the dropdown list — only those ones that are suitable for the selected coin. If there is no suitable wallet, you can click the Add button here to create a wallet for the selected coin without leaving the flight sheet setting window.
  • Pool — choose a pool from the dropdown list. After this you will see a pop-up window with additional settings:

Image for post

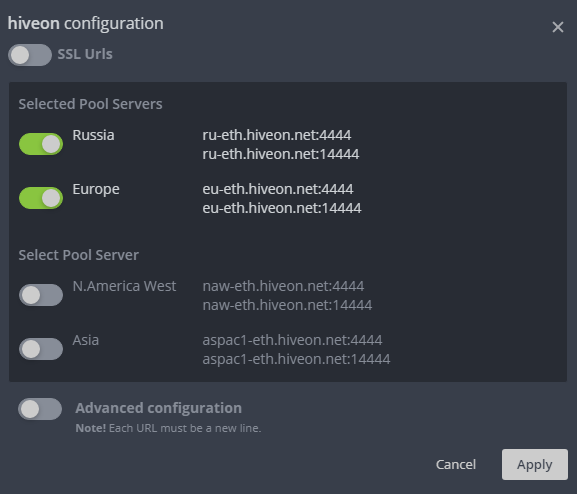
Here you need to configure the server selection order. To mine efficiently, we recommend choosing several servers — in case of loss of connection with one of them, your worker will automatically connect to the next server from those that you selected. For example, you selected the servers in the following order: Russian and European. First of all, your workers will connect to the Russian server. If the connection is lost, the next server your workers will connect to will be European.

Apart from this, you may need to provide the email address of your pool account. Keep in mind that this is required only on certain pools (those ones that authenticate users by email).

Both the server selection order and email can be edited later — to do this, click the Configure pool button. It will appear right after you select the pool and fill the fields in the pop-up window.

  • Miner — in the next dropdown list, you have to select a miner that will be used for your flight sheet. As soon as you do this, the Setup Miner Config button will appear in the Miner field.
  • Name — enter the name of your flight sheet. Just like in the case of a wallet, it is better to choose a special name to easily distinguish this particular flight sheet from the rest.

Step 3 (optional): setup miner config

You will need the Setup miner config window only in case you want to reconfigure specific parameters, such as the pool URL, forks, and so on. Note that the configuration window will vary depending on the miner you choose, but usually the pool’s address, wallet, password, and algorithm are included in the “minimum set” of fields.

Let’s explore the Setup miner config window on the example of SG miner. Here you can see the following fields:

  • Hash algorithm — this field is available for miners that support more than 1 algorithm.
  • Miner fork — this field is optional and available for those miners which build are based on this miner, and some specific algorithm (or algorithms) is added. At the same time all other configuration parameters, log files, and miner API are the same or have very minor differences.
  • Version — the latest version of the miner is always used by default. But if you need to use any other version, you can select it in this field.
  • Wallet and worker template — in this field you can enter the wallet or username for pools with registration. Here you can also specify the name of the worker (the dot is usually used in this case — this is necessary to identify the worker on the pool).
  • Pool URL — if necessary, in this field you can specify the address of the pool. Note that for templates in the field, as a rule, the value %URL% will be indicated, and the pool and its reserve addresses will be pulled from the pool settings.
  • Pass — the purpose of this field depends on the pool itself. The following options are possible:
  • To set up the worker name;
  • To set up the pool difficulty;
  • To set up a password for changing the payout threshold on the pool;
  • To set up any other pool specific values;
  • The field may have no value. In this case, it will be either empty, or it is considered that there is a password “x”.
  • Extra config arguments — in this field you can set up specific parameters — for example, to choose which cards to use for mining. This section can have two formats: the command line mode or JSON format. To determine which one is used for a particular miner, hover over the i icon.

If you changed anything in the Setup miner config window, click the Apply changes button.

Step 4: creating and applying the flight sheet

As soon as you fill all the essential fields, click the Create flight sheet button. That’s it! Now you can apply it to your workers. This can be done in two ways.

Option 1

Go to the Workers tab and select one of them. Then, in the worker menu, move to the Flight sheet tab and click the rocket icon at the right of that flight sheet which you would like to apply to your device. This method is ideal to use when you want to apply the flight sheet to one particular device.

Option 2

This method is suitable if you want to apply the flight sheet to several devices at once or even in bulk. Go to the Workers tab and check the boxes on the left side of the devices to which you plan to apply the flight sheet. In the menu bar, in the upper right corner, you will see the rocket icon — click it. A new window with a list of selected workers and available flight sheets will appear. Select a flight sheet and click the Apply button. In a few seconds, your workers will apply the changes, and start to mine and bring you income.

Following our guide, you can quickly create the required quantity of Hive OS flight sheets to manage even a large number of ASICs or GPU rigs and switch your devices from one set of settings to another in a few seconds. In this way, you will save your time and mine efficiently, and your devices will be generating revenue all the time.

1 Like

@HiveOS I’ve just set up a test rig under Hive OS and want to look at transferring a number of other rigs. Before I do so, I’m trying to better understand the process for transferring funds into “My Funds”.

There are a number of ways to do this but I want to use the simplest and most cost effective - transferring directly to my “personal address”. My problem is, where do I find my “personal address”.

I’ve been to “Your Funds” and selected Payment Provider = Hive and Coin = ETH.
When I click add a deposit address, nothing happens.

I then went to my farm and selected Billing. I selected Payment Provider = Hive and Coin = Eth. When I clicked the add deposit address, it generated an ETH address.

Is this my personal deposit address that I transfer to in order to deposit funds to my account?

One other thing, I’ve actually generated a second ETH address (playing around trying to work out what was going on). Is that a problem or can I use either of them to deposit?

@HiveOS I have another problem now. I have attached a rig with 6 x RX5700s and while it will boot up into Hive OS with no problems, trying to mine on Claymore gives me an error saying “AMD OpenCL platorm not found”

My searches have given lots of advice on how to (maybe) fix this if I am using a standard Linux release (and if I was able to work my way through all the Linux jargon) but nothing has worked within HiveOS and there is no apparent advice available on the website.

Can you advise me how to address this or point me to where there might be some help?

Are you using the beta version of HiveOS? You need that one for 5700s.

1 Like

No - missed that somewhere along the way. Will try that now.

LOL - all running now. Instead of uninstalling and trying to re-install drivers in an operating system that I know nothing about, I just needed to be running the correct version.

Thanks very much for your help.